Custom Interfaces
Prodigy ships with a range of built-in annotation interfaces for annotating text, images and other content. You can also put together fully custom solutions by combining interfaces and adding custom HTML, CSS and JavaScript.
Combining interfaces with blocks New: 1.9
Blocks are a new and exciting feature that let you freely combine different
annotation interfaces. For example, you can add a
text_input field to the ner_manual interface to collect
additional free-form comments from the annotators. Or you can add custom
html blocks before and after the image_manual UI or a multiple
choice interface. Here’s an example:
Blocks are defined as a list of dictionaries in the "config" returned by your
recipe and will be rendered in order.
They all use the data present in the current annotation task, unless you
override certain properties in the block. Each block needs to define at least a
"view_id", mapping to one of the existing
annotation interfaces.
recipe.py (excerpt)
In the above example, the "text" property of the second block is overwritten
and set to None, so it won’t render any text. That’s because both
ner_manual and choice render the "text" of an annotation
task if present, so it would show up twice, once in each block. The same is true for other content types such as "audio", "video", "image" when used in blocks with choice- they need to be set to None to prevent duplication. You typically
also want to define text_input settings with the block, so you can have
multiple inputs if needed and don’t need to store the presentational settings
with each annotation task.
Aside from the task content, you can also define the following config settings with each block:
html_template | HTML template with variables to render the task content. Setting it in the block allows you to have multiple custom HTML blocks rendering different content. |
labels | Label set used in the ner_manual and image_manual interfaces. Setting it in the block is a bit cleaner and technically allows you to create blocks using both interfaces together with different labels (although not necessarily recommended). |
Which content and config should go in the block vs. the task?
The annotation task, i.e. what your stream sends out, should contain the content you’re annotating and what you want to save in the database. The config and overrides in the blocks are applied to all tasks, so they should only really include presentational settings, like the HTML template to use, the ID or placeholder of input fields or overrides to prevent the same content from being displayed by several blocks.
Can I use multiple blocks of the same type?
Multiple blocks of the same type are only supported for the text_input
and html interface. For text input blocks, you can use the "field_id"
to assign unique names to your fields and make sure they all write the user
input to different keys. For HTML blocks, you can use different
"html_template" values that reference different keys of your task.
Example
Multi-page documents with pages New: 1.17
The pages interface lets you split a single annotation task over multiple sections, and even combine different interfaces, without losing the simplicity and efficiency of Prodigy’s card-based design. The UI also provides handy keyboard shortcuts for navigating between pages.
JSON task format
Pages can use any of the available annotation interfaces and also mix different UIs. To view the underlying JSON data of the examples below, click the button in the top right corner of the example annotation UI.
Multi-page text with span annotations
The pages interface can be especially useful for longer documents, multi-page PDFs or collections of images that should be viewed together.
Multi-page PDF with thumbnails
Pages can be defined in Prodigy’s JSON format as a list of "pages", and each individual page follows the respective JSON task format for the given interface. Each page also needs to provide a "view_id" to define its annotation interface. Config options defined at the recipe level are passed to all pages, and pages can optionally define their own "config". When you train a model with train or export the data with data-to-spacy, the "pages" will be automatically split into separate examples.
To load paginated examples from a directory, you can use the built-in Pages loader or set --loader pages in your recipe, with an optional sub-loader name for the content, e.g. --loader pages:jsonl or --loader pages:images.
When should I use pages vs. blocks?
The pages and blocks interfaces are similar in the sense that they let you combine multiple interfaces and content types in a single task view. However, the blocks UI operates from a single JSON task containing all required data for the blocks, whereas the pages provides multiple sub-tasks in the list of "pages".
This also means that blocks can only contain one instance of each annotation interface, whereas pages typically contain multiple instances of the same interface. If you want to combine different interfaces, like HTML, a text input and multiple-choice options, you should use blocks. If you want to split content, like a sections of a text to be annotated with spans, or a collection of images, use pages.
JSON data for blocks
JSON data for pages
Page titles and thumbnails
By default, page titles are numbers of the pages (starting at 1), but you can also customize them by providing a list of "page_titles" corresponding to the pages in order.
JSON task format
If you’re annotating images, the interface will render thumbnails in place of the titles by default, which you can toggle via the pages_show_thumbnails config setting. You can also customize the default height of the thumbnails via the pageThumbnailHeight theme setting.
Supporting pages in custom recipes
The pages UI is a container interface, which means that it automatically wraps other interfaces and doesn’t have to be specified explicitly by the recipe. If the incoming data is paginated and contains a list of "pages", Prodigy will use it automatically. This also means that your recipes stay flexible and will support paginated and non-paginated content out of the box.
To tell the stream which interface to use for the individual pages, you can provide a view_id argument to get_stream. The recipe itself returns its regular underlying view_id as well, and it’ll be able to support both paginated and unpaginated content.
recipe.py (excerpt)
Stream transforms applied via Stream.apply, e.g. to tokenize texts or add choice options, will automatically be applied to each page if the data is paginated. This also means that your functions stay reusable and supporting pages doesn’t typically require any changes to your recipe code, only the addition of the view_id to get_stream.
recipe.py (excerpt)
Generated example
Validation and ensuring pages are viewed
When the annotator navigates to a page, Prodigy will add "_viewed" property to each page, noting the timestamp of when the page was last shown. This lets you perform more in-depth analytics and also implement a custom validate_answer callback that alerts the annotator if a page hasn’t been accessed and only lets them proceed once they’ve viewed every page:
Custom validation callback
JSON data with view timestamp
Custom interfaces with HTML, CSS and JavaScript
The html interface lets you render any plain HTML content, specified as
the "html" key in the annotation task.
JSON task format
If you don’t want to include the full markup in every task, you can also specify
a html_template in your global or the project’s prodigy.json config file.
Prodigy uses Mustache to render the templates,
and makes all task properties available as variables wrapped in double curly
braces, e.g. {{text}}. Using HTML templates, you can visualize complex, nested
data without having to convert your input to match Prodigy’s format. When you
annotate the task, Prodigy will simply add an "answer" key.
For example, let’s say your annotation tasks look like this:
JSON task format
You could then write the following HTML template that has access to the task
properties as template variables, including the nested data.value:
HTML template
All theme settings will also be available to the custom interface via the
{{theme}} variable. This lets you re-use Prodigy’s color and styles, without
having to hard-code them into your template. For example:
<mark style="background: {{theme.bgHighlight}}">{{text}}</mark>JavaScript and CSS New: 1.7
Using custom CSS
The "global_css" config setting lets you pass in a string of CSS overrides
that will be added to the global scope of the app. As of v1.14.5 you can also
mount a directory with custom css code using "global_css_dir" or pass a list
of remote css files to load using "global_css_urls" config setting. This lets
you customize styles beyond just the color theme. As of v1.7.0, the Prodigy app
exposes the following human-readable class names:
| Class name | Description |
|---|---|
.prodigy-root | Root element the app is rendered into. |
.prodigy-buttons | Row of action buttons (accept, reject, ignore, undo). |
.prodigy-button-accept | New: 1.9 The accept button. |
.prodigy-button-reject | New: 1.9 The reject button. |
.prodigy-button-ignore | New: 1.9 The ignore button. |
.prodigy-button-undo | New: 1.9 The undo button. |
.prodigy-annotator | New: 1.9 Main container of the annotation UI (excluding the sidebar). |
.prodigy-sidebar-wrapper | New: 1.9 Container of the sidebar. |
.prodigy-sidebar | New: 1.9 The sidebar. |
.prodigy-sidebar-title | New: 1.9 The sidebar title bar. |
.prodigy-container | Container of the annotation card (including title, content, meta). |
.prodigy-content | Main content of the annotation card (containing the text or image). |
.prodigy-title | Title bar containing the label(s). |
.prodigy-title-wrapper | Sticky wrapper around the title bar containing the labels. |
.prodigy-meta | Meta information in the bottom right corner of the annotation card. |
.prodigy-text-input | Text input fields (<input> or <textarea>) created by the text_input interface. |
.prodigy-spans | New: 1.10.8 Spans container in interfaces like ner and ner_manual. |
.prodigy-labels | New: 1.11 Container of selectable labels, e.g. in ner_manual UI. |
.prodigy-label | New: 1.11 Individual selectable label, e.g. in ner_manual UI. |
.prodigy-options | New: 1.11 Container for choice options in choice UI. |
.prodigy-option | New: 1.11 Individual choice option in choice UI. |
In addition to the class names, some element also expose specific data
attributes. This lets you target them based on their value, e.g.
.prodigy-root[data-prodigy-view-id="ner"].
| Data attribute | Element | Description |
|---|---|---|
data-prodigy-view-id | .prodigy-root | The name of the current interface, i.e. "ner_manual". |
data-prodigy-recipe | .prodigy-root | The name of the current recipe, i.e. ner.manual or terms.teach. |
data-prodigy-label | .prodigy-label | New: 1.11 The name of a selectable label, e.g. "PERSON". |
data-prodigy-option | .prodigy-option | New: 1.11 The string value of a choice option, e.g. "1". |
Data attributes also allow you to implement custom styling specific to individual recipes or interfaces in the same global stylesheet. For example:
[data-prodigy-view-id='ner_manual'] .prodigy-title {  /* Change background for the title/labels bar only in the manual NER interface */  background: green;}
[data-prodigy-recipe='custom-recipe'] .prodigy-buttons {  /* Hide the action buttons only in a custom recipe "custom-recipe"  */  display: none;}
Using custom JavaScript
As of v1.7.0, the "javascript" config setting is available across all
interfaces and lets you pass in a string of JavaScript code that will be
executed in the global scope. As of v1.14.5 you can also mount a directory with
custom javascript code using "javasript_dir" or pass a list of remote
javascript files to load using "javascript_urls" config setting. This lets you
implement fully custom interfaces that modify and interact with the current
incoming task. The following internals are exposed via the global
window.prodigy object:
| Property | Type | Description |
|---|---|---|
viewId | string | The ID of the current interface, e.g. 'ner_manual'. |
config | object | The user configuration settings (e.g. prodigy.json plus recipe config). |
content | object | The content of the current task (e.g. {'text': 'Some text'}). |
theme | object | Theme variables like colors. |
update | function | Update the current task. Takes an object with the updates and performs a shallow (!) merge. |
answer | function | Answer the current task. Takes the string value of the answer, e.g. 'accept'. |
save | function | New: 1.18.0 Save the current progress. Equivalent to clicking or pressing command+s. |
event | function | New: 1.14.1 Call into a custom event_hook defined in a custom Prodigy recipe. |
resetQueue | function | New: 1.14.11 Reset the queue on the frontend. Meant to be used together with custom events. |
Here’s a simple example of a custom HTML template and JavaScript function that allows toggling a button to change the task text from uppercase to lowercase, and vice versa. For more details and inspiration, check out this thread on the forum.
HTML Template
JavaScript
Custom JavaScript events
You can also listen to the following custom events fired by the app:
| Event | Description |
|---|---|
prodigymount | The app has mounted. |
prodigyload | New: 1.18.0 The app has mounted and custom JavaScript and/or CSS was loaded. |
prodigyscriptload | New: 1.14.5 Custom JavaScript (inline or file) finished loading. |
prodigyupdate | The UI was updated (see details below). |
prodigyanswer | The user answered a question. |
prodigyundo | New: 1.8.4 The user hit undo and re-added a task to the queue. |
prodigysave | New: 1.18.0 The user saved their progress manually (doesn’t fire on auto-save). |
prodigyspanselected | A span was selected in the manual NER interface. |
prodigyend | New: 1.10.8 No more tasks are available. |
Some events expose additional data via the detail property. For example, the
prodigyanswer event exposes the task that was answered, as well as the answer
that was chosen: 'accept', 'reject' or 'ignore'.
JavaScript
The prodigyscriptload event exposes information about the loaded script:
| Property | Type | Description |
|---|---|---|
url | string | The URL of the loaded script, or 'inline' for inline JavaScript. |
local | boolean | true for inline scripts or locally mounted files, false for remote URLs. |
JavaScript
The prodigyupdate event
The prodigyupdate event fires whenever the current task changes. This includes:
- task navigation: moving to the next task after answering
- UI mutations: user interactions that modify the task (e.g., selecting spans in NER)
- programmatic updates: calling
window.prodigy.update()from your JavaScript code
Adding remote JavaScript and CSS Files New: 1.14.5
You can also add remote JavaScript and CSS Files to pull in your favorite Front End libraries to help build your perfect Prodigy interface. You can also mount local CSS or JS directories to the Prodigy FastAPI webapp and dynamically load your custom styles and JavaScript without having to inline JavaScript/CSS into Python strings inside your recipe file.
If you want you can even add a full-fledged framework like HTMX to your custom recipe and create a fully dynamic interface with Custom Events.
recipe.py
Custom Events New: 1.14.1
Prodigy has always emphasized being a scriptable, customizable tool. Custom Events allow even more customizability through interactivity. Custom events are registered functions that can be returned from a recipe and called via the Prodigy frontend.
As a simple example, let’s consider the Customer Feedback Sentiment Example in the previous section on Custom Recipes. You have examples of customer feedback and support emails to label with sentiment categories of “happy”, “sad”, “angry” or “neutral”.
Let’s expand on this scenario and imagine we have this Prodigy annotation session deployed on a secured cloud server with limited access rights. We have a scheduled job that saves new customer feedback each day to our cloud server but annotators don’t have access to the server to restart Prodigy. Using event hooks, we can implement a simple button to refresh the model from the Prodigy UI.
To start, we’ll launch our annotation server with the following data file.
feedback.jsonl
And a slightly modified version of the recipe from the Custom Recipes section.
recipe.py
For this example, we want to guarantee that changing models changes our
predictions so we know it’s working. Let’s note the load_model function above.
We’ll define this in a separate file and call it model.py.
The following code will handle loading 2 mock spaCy models that each have a
“textcat” component. One always assigns “happy” label, the other always
assigns the “sad” label. In reality these could just be 2 separate models on
disk, or 2 packaged spaCy models and you could adjust the load_model util
accordingly.
model.py
This will setup a standard multi-choice annotation interface but with one of the values pre-selected based on the currently selected model. We’re using mock textcat models for simplicity but you could easily use 2 or more packaged spacy models/models saved to disk with the same controls.
Now we’ll add a Recipe Event Hook to change the selected model, and rerun the model over our stream of data.
recipe.py
Finally, in order to actually call our event handler we need to add a small amount of custom JavaScript to this recipe. We’ll also add a custom HTML template with a single input where you can enter the new name of the model to use.
Custom HTML
The HTML template looks like this:
<link rel="stylesheet" href="https://cdnjs.cloudflare.com/ajax/libs/font-awesome/6.1.2/css/all.min.css" integrity="sha512-1sCRPdkRXhBV2PBLUdRb4tMg1w2YPf37qatUFeS7zlBy7jJI8Lf4VHwWfZZfpXtYSLy85pkm9GaYVYMfw5BC1A==" crossorigin="anonymous" referrerpolicy="no-referrer"/><Button id="refreshButton" onclick="refreshData()"> Refresh Data Stream <i id="loadingIcon" class="fa-solid fa-spinner fa-spin" style="display: none;" ></i></Button>Custom JavaScript
The following JavaScript code adds the refreshData function we reference in
the onclick method of our new button in the HTML template above. When the button
is clicked, we use the window.prodigy.event function to call into the event
handler defined in our recipe under the refresh_model event name.
function refreshData() { document.querySelector('#loadingIcon').style.display = 'inline-block' event_data = { new_model_name: 'textcat_mocker_sad_nlp', example: window.prodigy.content, } window.prodigy .event('refresh_model', event_data) .then(updated_example => { console.log('Updating Current Example with new data:', updated_example) window.prodigy.update(updated_example) document.querySelector('#loadingIcon').style.display = 'none' }) .catch(err => { console.error('Error in Event Handler:', err) })}And we’ll update the Recipe to use this custom JavaScript.
CWD = Path(__file__).parent
@prodigy.recipe(    "sentiment-refresh",    dataset=("The dataset to save to", "positional", None, str),    spacy_model=("Model to load", "positional", None, str),    source=("Path to texts", "positional", None, Path),)def sentiment(dataset: str, spacy_model: str, source: Path) -> ControllerComponentsDict:    """Annotate the sentiment of texts using different mood options."""    nlp = load_model(spacy_model)            # load in the mock TextCat model    stream = get_stream(source, rehash=True) # load in the JSONL file    stream.apply(add_options)                # add options to each task    stream.apply(add_predictions, nlp=nlp)   # add predictions to each task
    return {        "dataset": dataset,        "stream": stream,        "view_id": "blocks",        "config": {            "blocks": [                {"view_id": "choice"},                # Load custom Input for New Model Name                {"view_id": "html", "html_template": (CWD / "sentiment-refresh.html").read_text()}            ],            # Load custom JavaScript file.            "javascript": (CWD / "sentiment-refresh.js").read_text(),        },        "event_hooks": {            # add event handler endpoint at: `/event/refresh_model`            "refresh_model": refresh_model_event_handler        }    }...
Note that window.prodigy.event accepts an event name as the first argument,
and an Object with keys that exactly match the expected keyword-only arguments
to the Event Hook’s handler function we defined.
/// Event Callingevent_data = { new_model_name: 'textcat_mocker_sad_nlp', example: window.prodigy.content,}window.prodigy.event('refresh_model', event_data)Event Calling
If we run this example now, and click the Model Refresh button, we’ll see our predictions update in real time.
Example: Checking a single example against GPT-4
In this example, we a slightly extended version of the built-in Prodigy recipe
ner.llm.correct. The recipe uses a spacy-llm config to do zero-shot NER
prediction for text related to food. We’re looking to extract the following set
of labels.
- DISH: The names of food dishes, e.g. Lobster Ravioli, garlic bread
- INGREDIENT: Individual parts of a food dish, including herbs and spices
- EQUIPMENT: Any kind of cooking equipment. e.g. oven, cooking pot, grill
To conserve our limited project funding, we’re using the older, cheaper
text-davinci-002 model from OpenAI in our config.
This will get us a good start on a lot of our annotations, but as an example of the kind of interactivity you can build, we’ll develop an interface and a custom event that allows us to consult a newer, more capable model (e.g. GPT-3.5 or GPT-4) for a single annotation. For instance, we might want to check with GPT-4 on a really difficult example.
For this project we’ll utilize the blocks feature to develop a custom
interface with a button we can press to send a custom event and check what GPT-4
has to say about the current example. The interface we’ll be building looks like this:
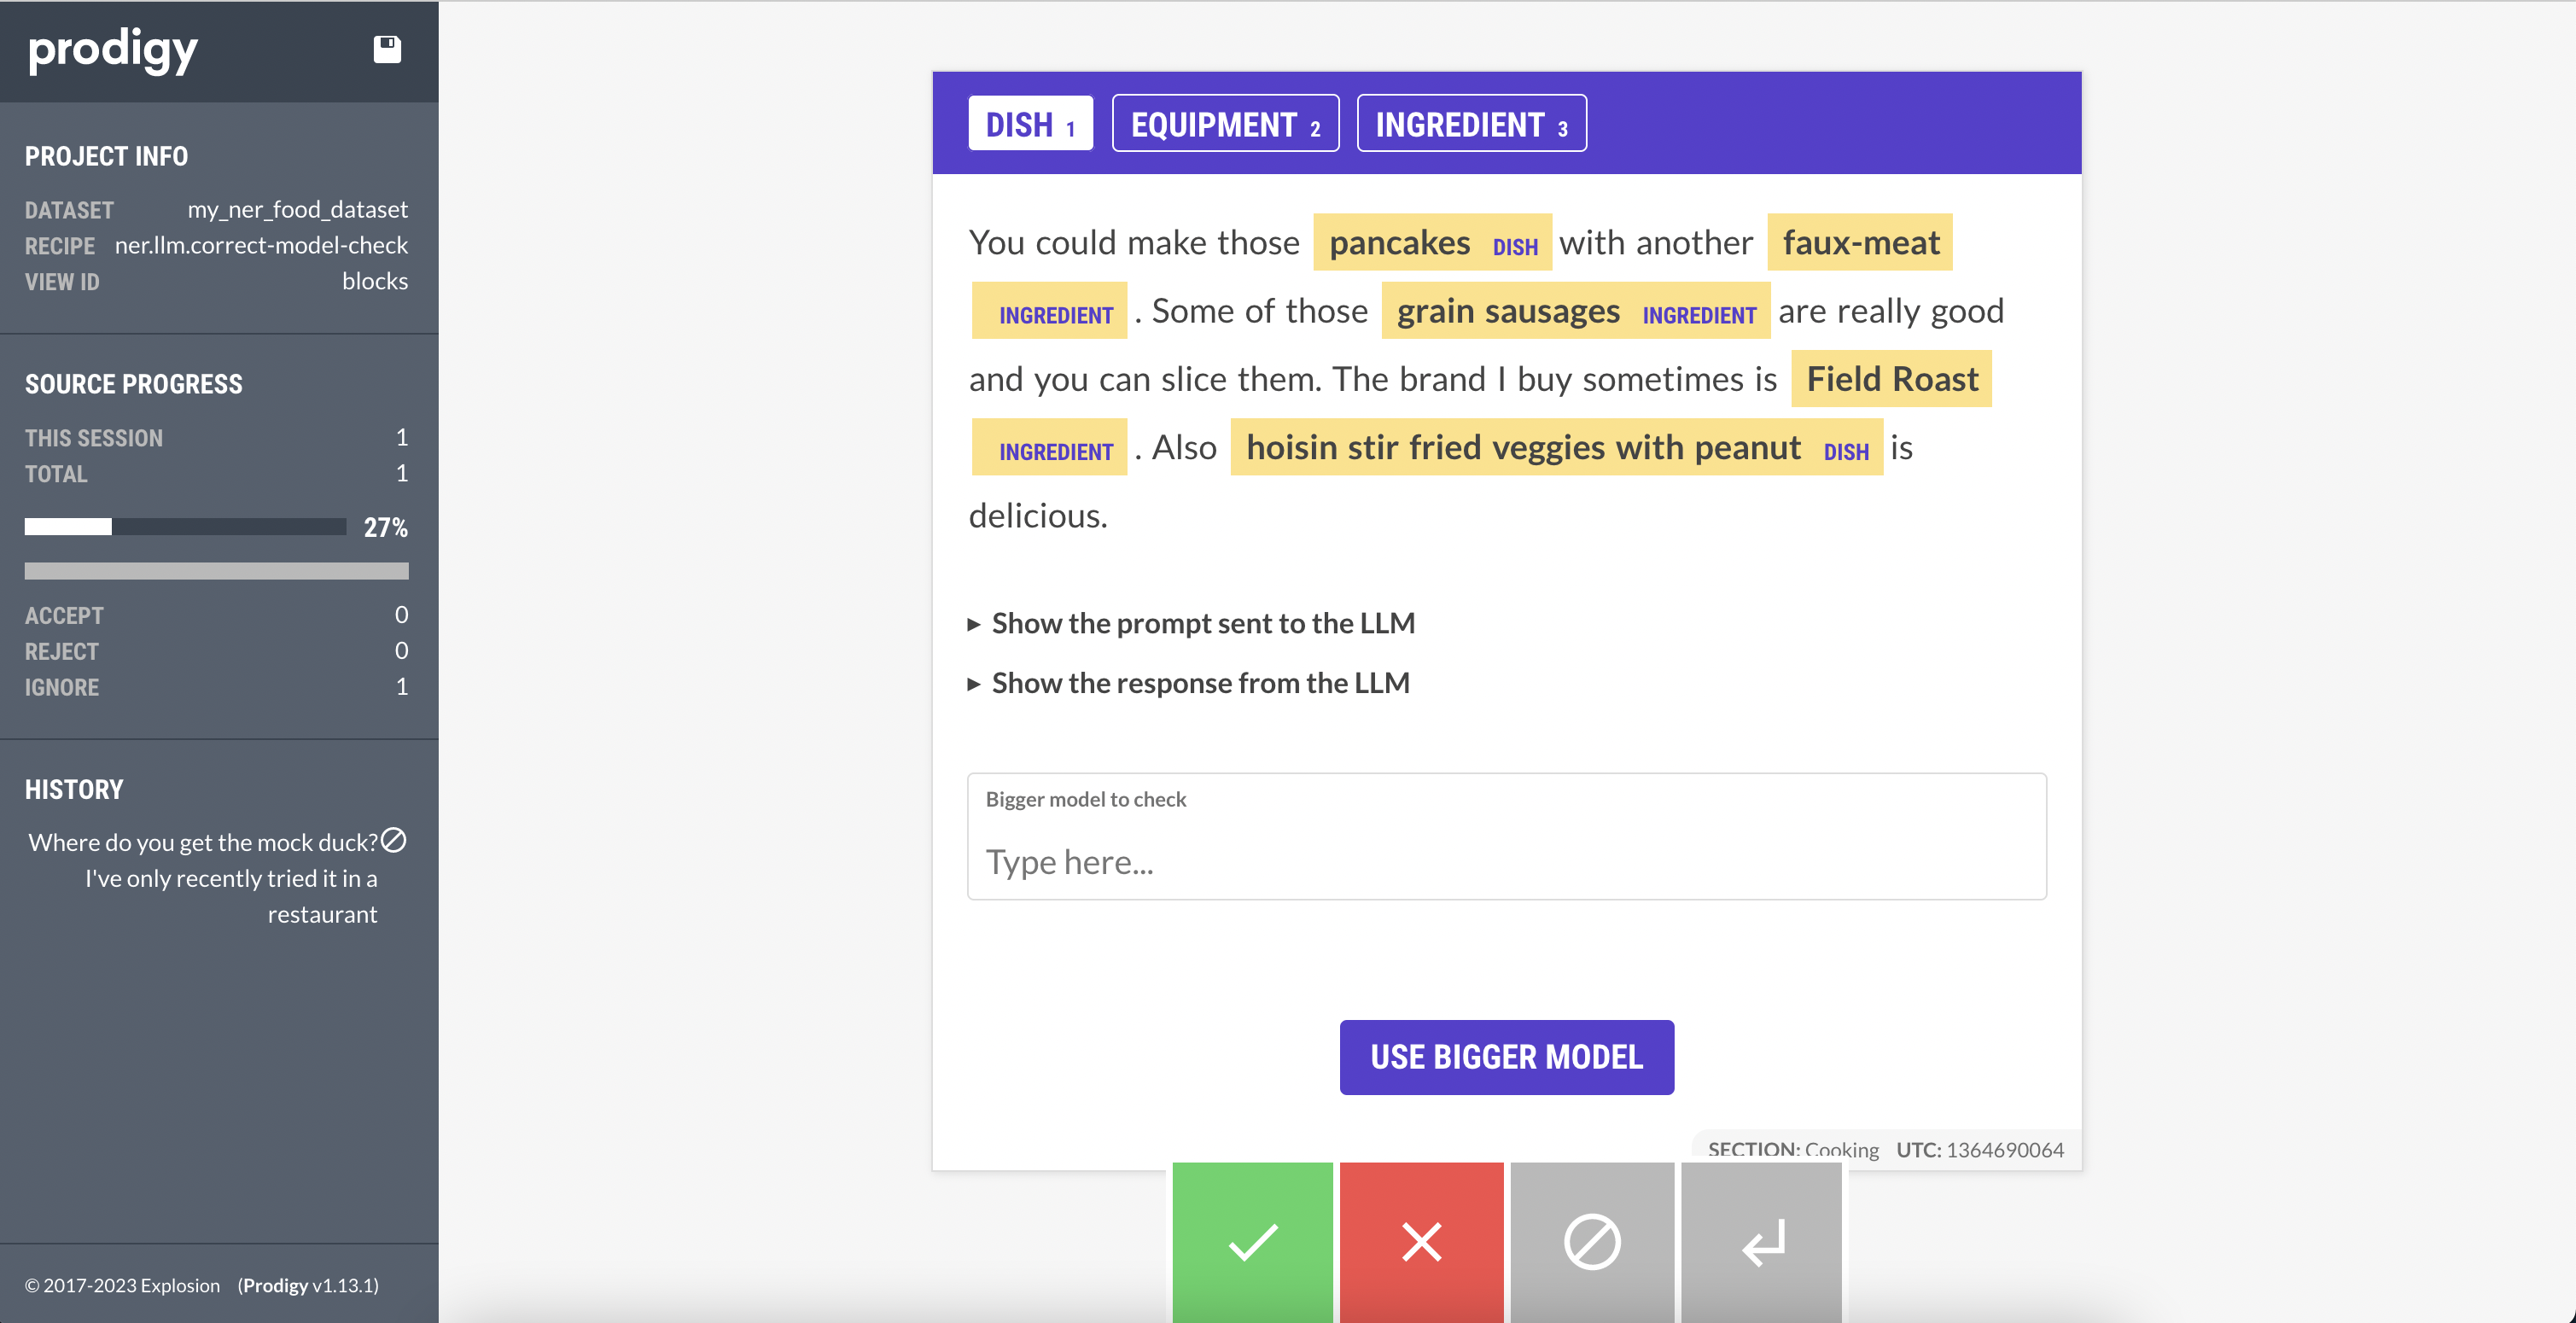
If we press this button, we’ll be calling a custom event that will in turn call GPT-4 and update our example in place with the NER predictions it sends back.