Prodigy – everything you need to know
Prodigy is a modern annotation tool for creating training and evaluation data for machine learning models. You can also use Prodigy to help you inspect and clean your data, do error analysis and develop rule-based systems to use in combination with your statistical models.
The Python library includes a range of pre-built workflows and command-line commands for various tasks, and well-documented components for implementing your own workflow scripts. Your scripts can specify how the data is loaded and saved, change which questions are asked in the annotation interface, and can even define custom HTML and JavaScript to change the behavior of the front-end. The web application is optimized for fast, intuitive and efficient annotation.
Prodigy’s mission is to help you do more of all those manual or semi-automatic processes that we all know we don’t do enough of. To most data scientists, the advice to spend more time looking at your data is sort of like the advice to floss or get more sleep: it’s easy to recognize that it’s sound advice, but not always easy to put into practice. Prodigy helps by giving you a practical, flexible tool that fits easily into your workflow. With concrete steps to follow instead of a vague goal, annotation and data inspection will change from something you should do, to something you will do.
Try the live demo Get ProdigyWhat Prodigy isn’t
-
Prodigy isn’t “software as a service” – it’s a tool that you can download, install and run yourself. This has several benefits: you can interact with it programmatically, import and extend it, and you don’t need to upload anything into the cloud. Prodigy never “phones home” or connects to our servers, and no data ever leaves your machine.
-
Prodigy isn’t free or open-source, although you do get some parts of the source code, and it does have great docs and an awesome community. Purchasing Prodigy does support open-source software though: we use revenue from Prodigy for a number of open-source projects, including our popular NLP library spaCy.
-
Prodigy doesn’t provide a lot of annotation-adjacent functionality, such as user accounts or project management. We designed Prodigy to be the best tool possible for teams working on rapidly evolving projects.
First steps with Prodigy
Prodigy can be installed into your Python environment like any
other library. The main way to interact with it is via the command line using
the prodigy command, followed by the name of a recipe you want to run and
optional settings. For example, to make sure everything it set up correctly and
to view details about your installation, you can run the stats recipe:
Troubleshooting: I see 'prodigy: command not found'
First, check whether python -m prodigy works. If it does, there might be a
problem with your PATH variable. This happens more often with conda
environments and on Windows. See here for
workarounds – however, executing with python -m might be easier than resolving
the problem:
python -m prodigy statsIf python -m prodigy doesn’t work, check whether the correct environment is
activated, and check whether Prodigy is installed. If you’re using the system
Python rather than an environment, you might need to run python3 rather than
python. If the first thing you see is a SyntaxError, you’re most likely
running Prodigy with Python 2 instead of Python 3.
Recipe scripts are what power the different annotation workflows. Prodigy ships
with a variety of built-in recipes for different workflows and
tasks. For example, the ner.manual recipe lets you annotate data for
named entity recognition (NER) by manually highlighting the phrases and
concepts. Clicking on a recipe name on this page takes you to the more detailed
documentation.
1. Start the annotation server and label some examples
Let’s try it out and use ner.manual to highlight some entities in text.
You can use your own data in one of the
supported formats or download our example dataset of
news headlines about Silicon Valley from the New York times.
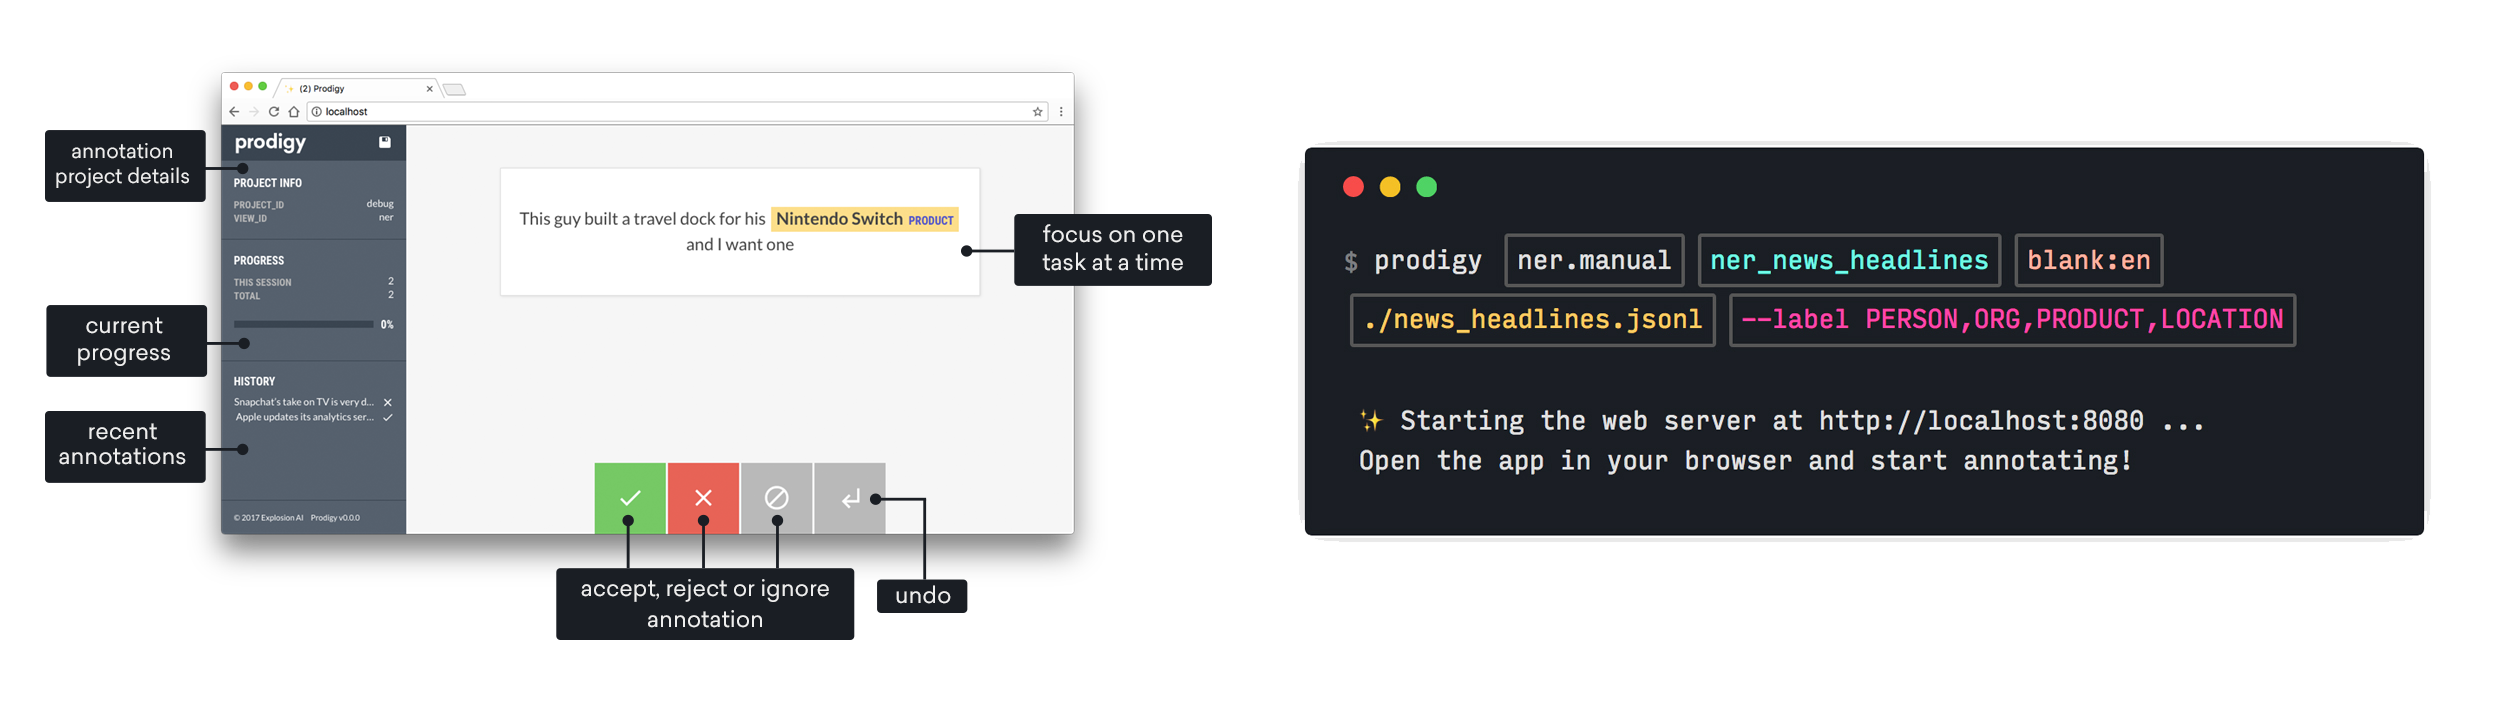
You can now run the following command in your terminal and hit enter.
The command tells Prodigy to run the ner.manual recipe with the
following settings that it needs: the name of a dataset to save the annotations
to (just make something up), the spaCy pipeline or
language to tokenize the text
(blank:en for a blank English model, more on that later), the path to the text
you want to label and a comma-separated list of label options (PERSON, ORG,
PRODUCT and LOCATION). By the way, you can also click the copy-paste button
to copy the command to your clipboard and hover over the components for more
info!
Troubleshooting: The app says 'Oops, something went wrong'
The “Oops, something went wrong” message and the red popup are the app’s way of telling you that the Prodigy server raised an error. If you navigate to the terminal, it will show you more details about what went wrong. Some potential problems are:
-
Can’t find file: Check that you’ve downloaded the
news_headlines.jsonlfile or any other file you want to use, and that you’ve placed it into the current working directory (or that you’re using the correct path if you’ve put it somewhere else). -
Invalid JSON: This might happen if you load in your own data and it means that there’s something wrong with this line of JSON and Python can’t load it. If you’re using a
.jsonlfile, make sure that each line contains one valid JSON object. See the input data formats for examples. You can also use a JSON linter to check your data. -
Error while validating stream: no first example: This error occurs if Prodigy couldn’t find any examples to send out for annotation. Make sure that your data has the correct format – if none of your records have a
"text", Prodigy will skip them because it doesn’t know where to find the text, resulting in an empty stream.
When you open your browser at http://localhost:8080, you should see the
Prodigy UI and an annotation question that looks something like this. You can
now select a label at the top and click and drag to highlight a span of text –
for example, you can highlight “Uber” as an ORG and “Silicon Valley” as a
LOCATION.
Try it live and highlight entities!
Because the text is pre-tokenized and Prodigy knows where words start and end, you don’t have to select the exact letters – you just need to roughly hit the words and token span will be highlighted. For single words like “Uber”, you can also double-click on the word. To submit an annotation, click the green accept button or press the a key on your keyboard. If you don’t know the answer, you can click ignore or press space. Once you hit accept, reject or ignore, the example will move into your outbox. You can go back through the annotations in your outbox by clicking the undo arrow, or pressing backspace. As you annotate, batches of examples will be cleared from your outbox and sent back to the Prodigy server to be saved in the database. You can also hit the save button in the top-left corner or press command+s (on Mac) or ctrl+s to clear your outbox and manually save.
2. Look at the annotated data
If it’s your first time running Prodigy, you probably want to check out the
data, just to see what you’ve created. The db-out command takes the name
of a dataset and lets you export its contents to a file. Datasets are how
annotations you collect are stored in Prodigy’s database. You typically want to
use a new dataset for each new experiment.
Here’s what the output could look like – each example now includes the
"tokens" and has a "spans" property describing the entities you highlighted.
Each span includes the "start" and "end" offset into the text and the
"label" you selected.
annotations.jsonl (example)
At any point, you can export your data and use it in a different process, e.g. to train a model outside of Prodigy. To train in Prodigy, all you need is the name of the dataset.
3. Keep annotating and run a training experiment
To keep annotating and label more data, you can re-run the ner.manual
command and it’ll start again from where you left off. You might also want to
create a new dataset and use your own data at this point. Once you’ve collected
a few hundred examples, you can use the train command to run your first
training experiment with spaCy. The arguments let you define
the components to train from different, comma-separated datasets – in this case,
--ner ner_news_headlines to train from the annotations collected in
ner_news_headlines.
In this example, we’re training with 372 total annotations. If you don’t provide
an evaluation dataset with the eval: prefix, Prodigy will hold back a
percentage of examples for evaluation, so you can see how your model does on
unseen data.
If you want to export your model after training, you can specify an output directory:
Annotating data and training models is an iterative process. You often want to start over and try a different approach, try out new data or experiment with a different label scheme. Prodigy can make this process easier. For more details and strategies, including how to speed up annotation by preselecting entities and putting a model in the loop, check out the full documentation on named entity recognition with Prodigy.
4. Start a new project and assign categories to texts
When you open your browser at http://localhost:8080, you should see the
Prodigy UI and an annotation question that looks something like this. You’re now
able to select one or more options from the list of labels. Once you’ve made
your selection, you can click accept or press a to submit
the answer. Don’t forget to hit save when you’re
done! Prodigy will also save periodically in the background.
Try it live and select options!
In this example, the classes are not mutually exclusive, so one text can
have multiple categories. If you want your labels to be mutually exclusive
so you can only select one, you can set the --exclusive flag when you run
textcat.manual. The answer will now be submitted automatically when you
select an option, because there’s only one thing to select. If you make a
mistake, you can always hit undo.
After annotation, you can run db-out to export your data (see the
choice interface for details on the data format of multiple choice
annotations), or use the train command to train a
spaCy model. You can also train multiple components at the
same time, using different datasets.
Recipes and data flow
When you run Prodigy on the command line using the prodigy command, you
execute a recipe script. Recipes are Python functions that define the
annotation workflow – for example, the stream of examples to annotate, an
optional callback to execute when new answers come in, how to load and
preprocess the data, which annotation interface to use
and where to save the annotations.
If a recipe defines these components and you run it, Prodigy will start the annotation server, including the REST API and web application. The web app will request batches of examples to annotate, and send back batches of answers in the background (or whenever you hit save). All answers are then saved to the database.

Recipes can also define optional callback functions that are executed whenever new answers are received by the server. This allows you to update a model in the loop. Streams of incoming examples are Python generators, and Prodigy will only ever ask for the next batch of examples. If you’re using a model to score the stream and decide what to send out for annotations, updates to the model weights will be reflected in future batches.
Here’s an example of a simple recipe function that uses the JSONL
loader to load data from a file, renders it
as plain text using the text interface, saves the annotations to a
given dataset and executes a function update whenever new answers are
received.
recipe.py
Glossary
In the documentation, you’ll come across a variety of terms specific to collecting annotations with Prodigy. Here’s a quick overview of the most common ones, including a short description and links for more information.
| Term | Description |
|---|---|
| annotation task | A single question you’re collecting feedback on from the annotator. For example, whether an entity is correct or whether a label applies to a text. Internally, annotation tasks are simple dictionaries containing the task properties like the text, the entity spans or the labels. Annotation tasks are also often referred to as “(annotation) examples”. |
| annotation interface | The visual presentation of the annotation task. For example, text with highlighted entities, text with a category label, an image or a multiple-choice question. In the code, this is also often referred to as the view_id. See here for an overview of available options. |
| dataset | A named collection of annotated tasks. A new dataset is usually created for each project or experiment. The data can be exported or used to train a model later on. |
| session | A single annotation session, from starting the Prodigy server to exiting it. You can start multiple sessions that add data to the same dataset. The annotations of each sessions will also be stored as a separate dataset, named after the timestamp. This lets you inspect or delete individual sessions. As of v1.7, Prodigy also supports named multi-user sessions. |
| database | The storage backend used to save your datasets. Prodigy currently supports SQLite (default), PostgreSQL and MySQL out-of-the-box, but also lets you integrate custom solutions. |
| recipe | A Python function that can be executed from the command line and starts the Prodigy server for a specific task – for example, correcting entity predictions or annotating text classification labels. Prodigy comes with a range of built-in recipes, but also allows you to write your own. |
| stream | An iterable of annotation tasks, e.g. a generator that yields dictionaries. When you load in your data from a file, Prodigy will convert it to a stream. Streams can be annotated in order, or be filtered and reordered to only show the most relevant examples. |
| loader | A function that loads data and returns a stream of annotation tasks. Prodigy comes with built-in loaders for the most common file types and a selection of live APIs, but you can also create your own functions. |
| sorter | A function that takes a stream of (score, example) tuples and yields the examples in a different order, based on the score. For example, to prefer uncertain or high scores. Prodigy comes with several built-in sorters that are used in the active learning-powered recipes. |
| task / input hashes | Hash values assigned to each incoming annotation task that let Prodigy determine whether two tasks are identical, completely different or different questions about the same input (e.g. the same text with different suggested labels). See the docs on hashing for more info. |
| spaCy pipeline | One of the available pipeline packages for spaCy. Pipelines can be installed as Python packages and are available in different sizes and for different languages. They can be used as the basis for training your own model with Prodigy. |
| active learning | Using the model to select examples for annotation based on the current state of the model. In Prodigy, the default selection is usually based on examples the model is most uncertain about, i.e. the ones with a prediction closest to 0.5. |
| (batch) training | Training a new model from a dataset of collected annotations. Using larger batches of data and multiple iterations usually leads to better results than just updating the model in the loop. This is why you usually want to collect annotations first, and then use them to batch train a model from scratch. |
| gold-standard | Reference annotations for a model to learn from, or be evaluated against. Note that a “gold-standard” isn’t always completely correct: it could have known missing information, or you could believe that some of the annotations might be incorrect. |