Named Entity Recognition
Tagging names, concepts or key phrases is a crucial task for natural language understanding pipelines. Prodigy lets you label NER training data or improve an existing model’s accuracy.
Quickstart
I want to train a new model with new categories from scratch.
If you’re starting from scratch, you can use the ner.manual recipe with
raw text and one or more labels and start highlighting entity spans. See the
docs on fully manual annotation for an example. To make the process
faster and more efficient, you can also use patterns to
pre-highlight entities, so you only need to correct them. If you know that
“Barack Obama” is pretty much always a PERSON, you can write a pattern for
that. If you have a spaCy pipeline that’s already
doing an okay job at predicting some of your entities, you can use
ner.correct to pre-highlight them for you, so you only have to correct
the suggestions and add new categories.
Once you’ve collected a dataset of maybe a few hundred annotations, you can run
training experiments to see if you’re on the right track. The
train recipe takes one or more Prodigy datasets, trains a model and
outputs statistics and results. You can also use data-to-spacy to export
data in spaCy’s format to use with
spacy train, or db-out to export your
annotations to use in any other process or application.
I want to improve an existing spaCy NER model.
If you want to improve and correct an existing model on your data, you can use
the ner.correct recipe to pre-highlight the model’s predictions, correct
them manually and then update the model with the new data.
See here for an example of the annotation workflow.
Instead of annotating every example, you can also use the model to suggest the
analyses it’s most uncertain about. This workflow is implemented in the
ner.teach recipe and you can see an example project
in this section. Annotation can be very efficient, because
you only have to press accept or reject. Once you’re done
annotating, you can use train to update your model from the binary
annotations so that both accepted and rejected examples have an impact.
I want to label overlapping and nested spans or longer phrases.
If your goal is to extract longer phrases or nested and overlapping spans, a named entity recognizer won’t be a good fit for your problem: it will predict token-based tags and expects that a token can only be part of one entity. It also takes advantage of exact span boundaries, which is very effective for named entities like proper nouns, but less helpful for longer phrases.
Instead of using the named entity recognition workflows, check out the
documentaton on span categorization and the
spans.manual recipe, which was introduced in Prodigy v1.11. It lets you
label any number of potentially overlapping or nested spans and you can then use
the data to train spaCy’s
SpanCategorizer component or a similar
model.
I want to plug in and correct a non-spaCy model.
Prodigy represents entity annotations in a
simple JSON format with a "text", a
"spans" property describing the start and end offsets and entity label of each
entity in the text, and a list of "tokens". So you could extract the
suggestions from your model in this format, and then use the mark recipe
with --view-id ner_manual to label the data exactly as it comes in.
You can also write a custom recipe with a custom stream
(a regular Python generator!) to plug in your model. If you can load and run
your model in Python, you can use it with Prodigy. See
the section on custom models for an example. If you want to use
active learning with a custom model, you can make your recipe return an update
callback that’s called whenever a new batch of answers is sent back from the web
app. However, there are a few more considerations here, like how sensitive your
model is to small updates. See this section for
details and an example.
I want to annotate data to fine-tune transformer weights like BERT.
If your goal is to fine-tune a transformer model, you can use Prodigy to make annotation more efficient by streaming in data tokenized with the algorithm you need for your model. This also ensures that the data you create always maps to valid tokens produced by your model – no matter how intuitive or unintuitive the word piece tokenization is. You can read more about this in the docs on efficient annotation for transformers.
I want to edit the text while annotating spans.
Prodigy v1.18.0 introduces a new feature for editing text during
span annotation that you can enable it by setting --edit-text in the
ner.manual recipe. This will add an edit button
and
keyboard shortcuts to the interface. On
save, the edited text is sent back to the recipe and a new tokenized example
is generated. You can also customize how the back-end should
handle the edited text and existing spans. For a simpler approach, you can also
do editing and text annotation in separate steps.
I already have annotations and just want to train a model.
If you have existing annotations, you can convert them to Prodigy’s format and
use the db-in command to import them to a new dataset. Each record should
have a "text" and a list of "spans". You can then run train to train
your model, use ner.manual to add more annotations, or run the
review recipe to correct mistakes and resolve conflicts.
If all you want to do is train and you don’t need to collect or correct any annotations, you might find it more efficient to just train with spaCy (or any other library) directly.
I'm not sure if NER is a good fit or if I should train a text classifier.
Named entity recognition models work best at detecting relatively short phrases that have fairly distinct start and end points. A good way to think about how easy the model will find the task is to imagine you had to look at only the first word of the entity, with no context. How accurately would you be able to tell how that word should be labelled? Now imagine you had one word of context on either side, and ask yourself the same question.
With spaCy’s current defaults (as of v2.2), the model gets to see four words on either side of each token (it uses a convolutional neural network with four layers). You don’t have to use spaCy, and even if you do, you can reconfigure the model so that it has a wider contextual window. However, if you find you’re working on a task that requires distant information to make the decisions, you should consider learning at least part of the information you need with a text classification approach.
Entity recognition models will especially struggle on problems where the annotators disagree about the exact end points of the phrases. This is a common problem if your category is somewhat vague, like “cause of problem” or “complaint”. These meanings can be expressed in a variety of ways, and you can’t always pin down the part of a sentence that expresses a particular opinion. If you find that annotators can’t agree on exactly which words should be tagged as an entity, that’s probably a sign that you’re trying to mark something that’s a bit too semantic, in which case text classification would be a better approach.
Choosing the right recipe and workflow
So you have an NER problem you want to solve, and data to annotate. And you want to get it done as efficiently as possible. But how do you pick the right workflow for your use case?
-
Fully manual: This is the most classic way of annotating data. You’re shown a raw text and highlight all entity spans in the text. At the end of the process, you export “gold-standard” data that you can train your model with. Fully manual annotation is often the best choice if you want to create a new dataset, but are starting completely from scratch without any existing resources you can leverage. In Prodigy, you can use this workflow with the
ner.manualrecipe. -
Manual with suggestions from patterns: Fully manual annotation can easily get tedious, which leads to mistakes and inconsistent data. You’re often doing the same thing over and over – for instance, in your data, mentions of “New York” may pretty much always refer to the location. Instead of labelling it by hand every single time, you can use keyword lists and patterns describing the tokens you’re looking for and make Prodigy pre-highlight the candidates for you. Even if your patterns only help 50% of the time, that’s still 50% less work for you. In Prodigy, you can use this workflow with
ner.manualand the--patternsoption. Also see the docs on patterns. -
Manual with suggestions from model: Instead of patterns, you can also use an existing model to highlight suggestions and save you time. This workflow is also useful if you want to train a model with a mix of new and existing categories. You can use the existing model to help you label the entity types you’re interested in, correct any mistakes it makes and add a new category on top. In Prodigy, you can use this workflow with the
ner.correctrecipe for spaCy pipeline or a custom recipe for any other model that predicts named entities. -
Binary with active learning and a model in the loop: This workflow is useful if you already have a model and want to fine-tune it on more data. Instead of annotating every example, you can use the model to suggest you the most relevant examples to annotate and give it feedback on its predictions. There are many different ways you can select the “best” examples, and a whole line of research dedicated to exploring active learning techniques. Prodigy’s
ner.teachrecipe implements simple uncertainty sampling with beam search: for each example, the annotation model gets a number of analyses and asks you to accept or reject the entity analyses it’s most uncertain about. Based on your decisions, the model is updated in the loop and guided towards better predictions. Prodigy also includes utilities that let you implement custom workflows with a model in the loop.
Video tutorial: training a model to predict ingredients
The following video shows an end-to-end workflow for training a named entity
recognition model to recognize food ingredients from scratch, taking advantage
of semi-automatic annotation with ner.manual and ner.correct, as
well as modern transfer learning techniques. It took around 2.5 hours to
create 949 annotations, including 20% evaluation examples, which was enough
to achieve 85% accuracy. You can download the raw and annotated datasets
from GitHub.
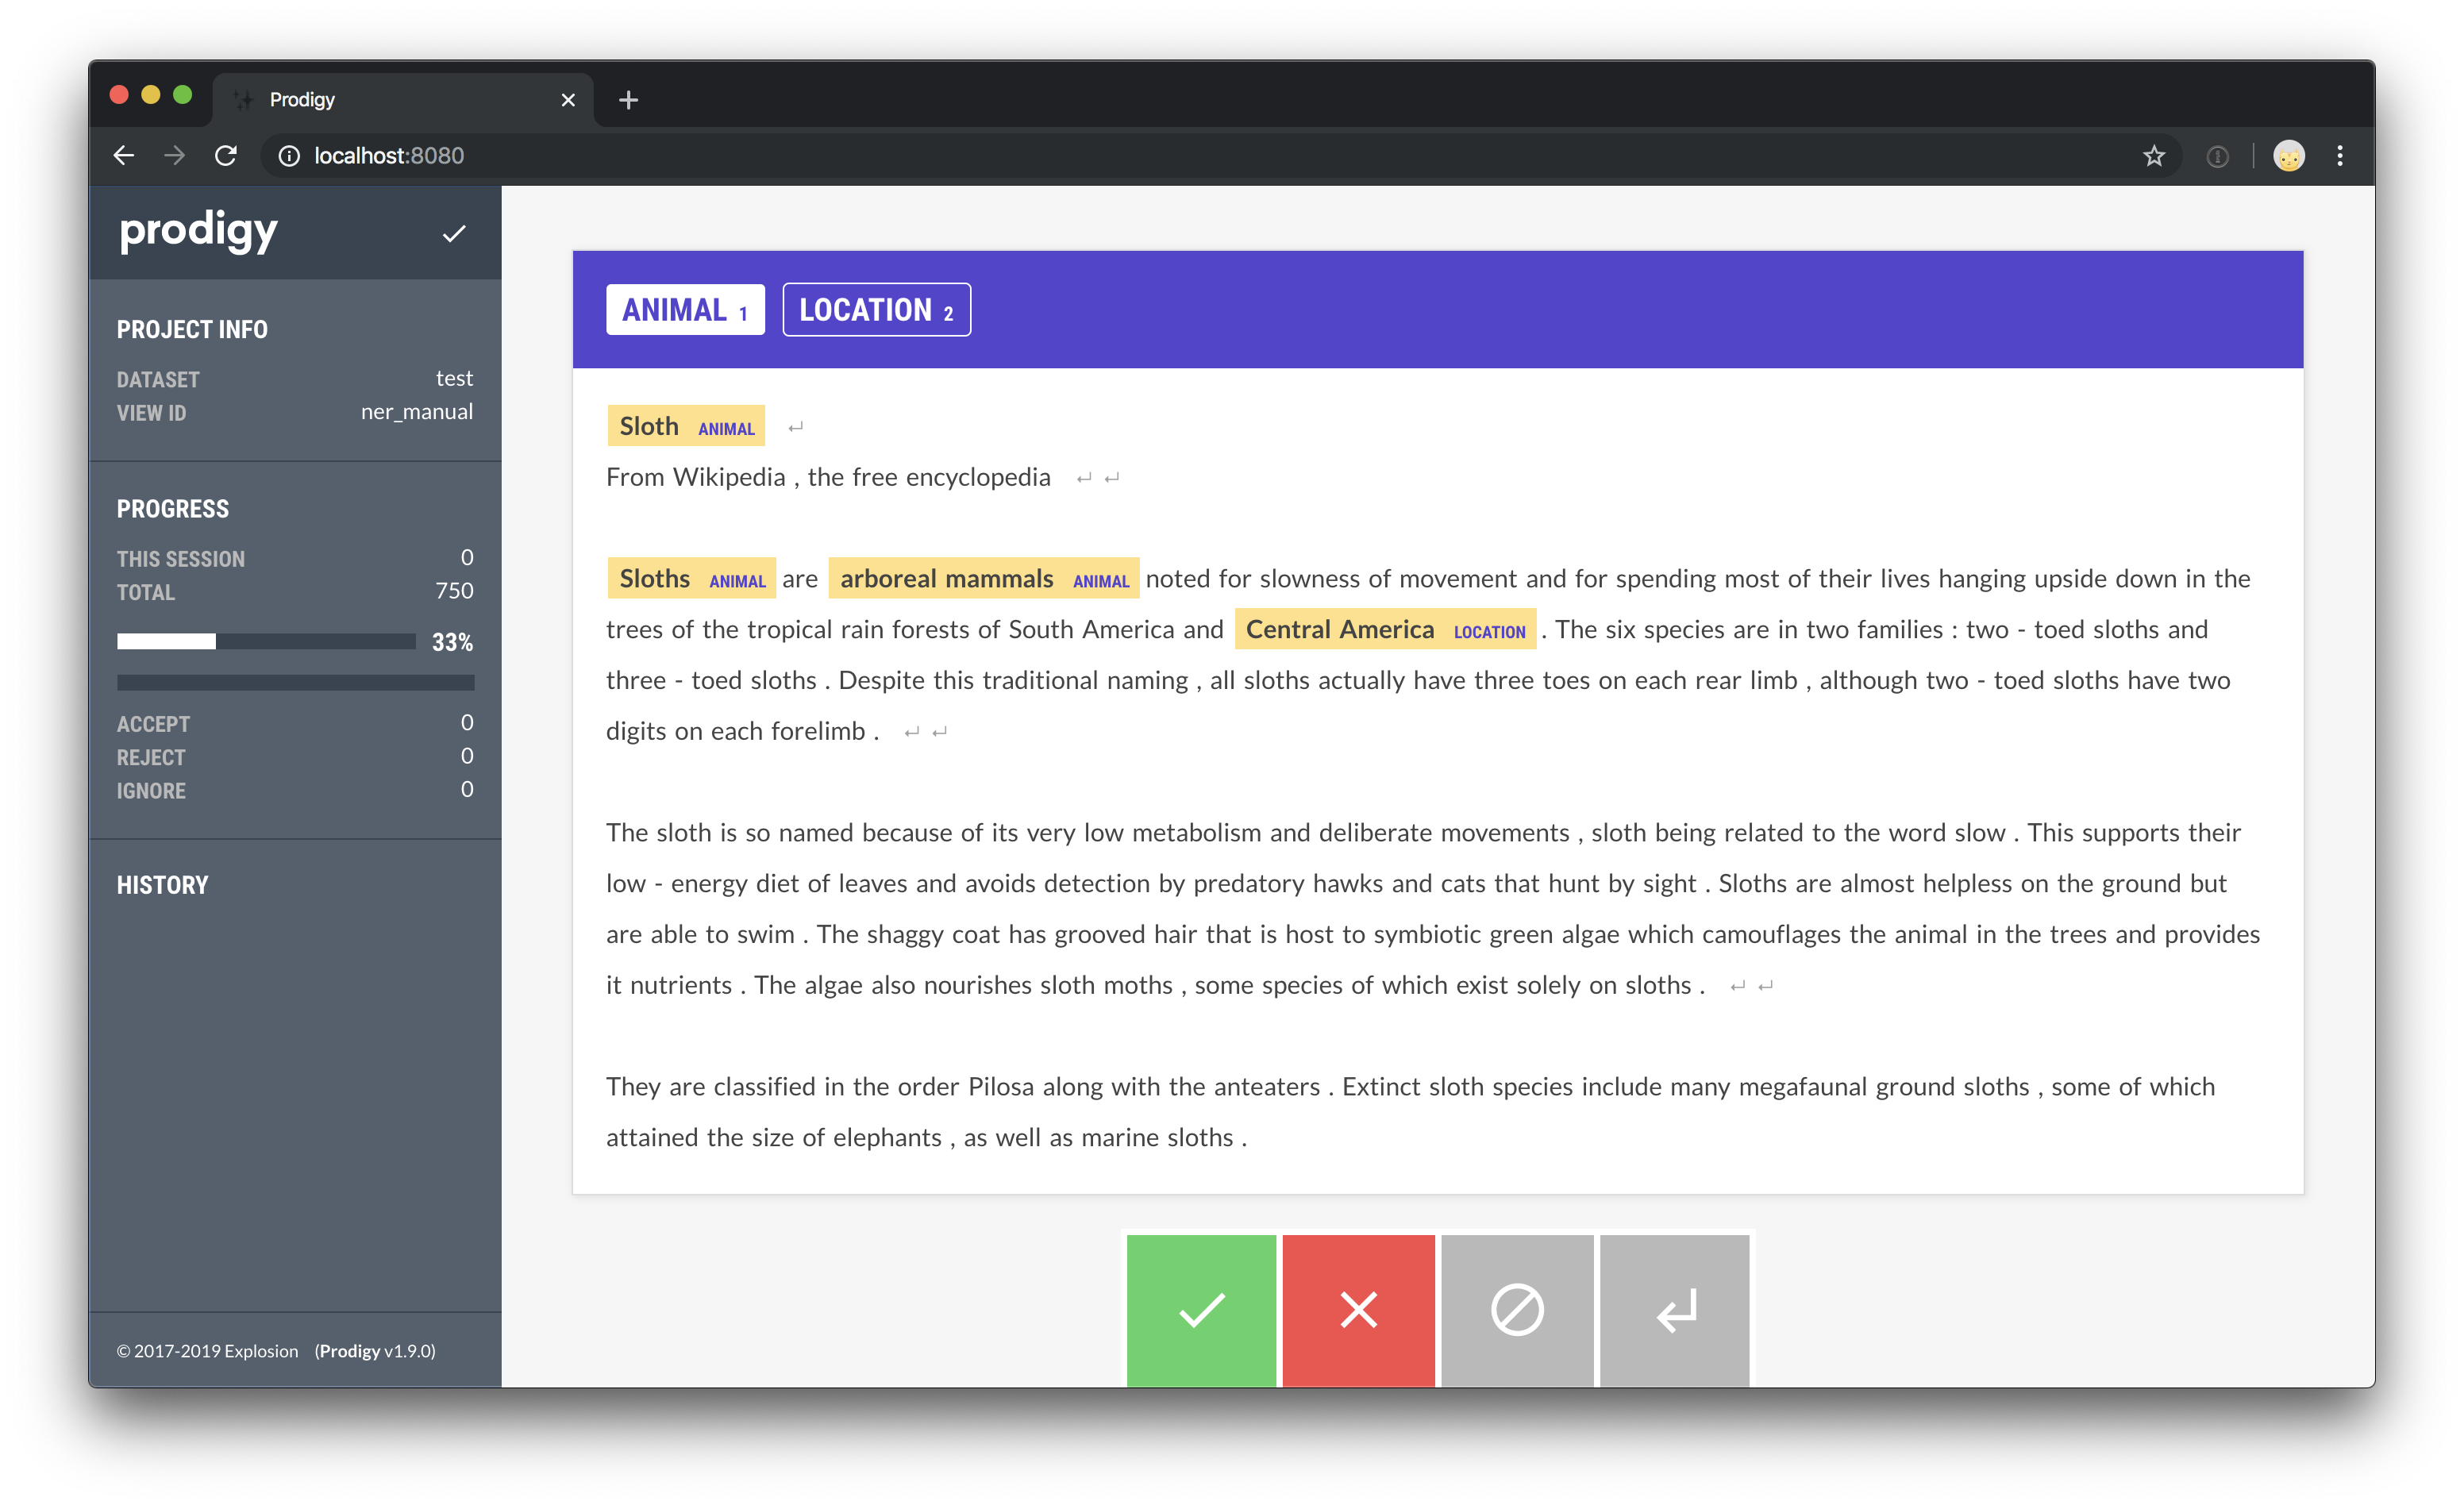
Fully manual annotation
To get started with manual NER annotation, all you need is a file with raw input
text you want to annotate and a spaCy pipeline for
tokenization (so the web app knows what a word is and can allow more efficient
highlighting). The following command will start the web server with the
ner.manual recipe, stream in headlines from news_headlines.jsonl and
provides the label options PERSON, ORG and PRODUCT.
Try it live and highlight entities!
When should I press accept, reject or ignore?
When you hit the accept, reject or ignore
buttons, your answer will be submitted and Prodigy will add an "answer" key to
the annotation task dict – for example, "answer": "accept". When you’re
annotating manually, you typically only want to use accepted answers. This
should also include examples with no entities! Those are just as important
for the model to learn from than examples with entities. Ignoring an answer
typically means that you want to skip it completely and exclude it from
everything – for example, because you don’t know the answer or because the
question is confusing or not representative. The reject button is
less relevant in manual annotation mode, because there’s nothing to say no to –
however, you can use it to reject examples that have actual problems that need
fixing, like messy tokenization (that won’t let you highlight the entities you
need), unicode issues and so on. When you view or export your data later, e.g.
with db-out, you can then explicitly filter out those examples and deal
with them.
Why should I use a tokenizer?
Pre-tokenizing the text for the manual interfaces allows more efficient annotation, because the selection can “snap” to the token boundaries and doesn’t require pixel-perfect highlighting. Even if you only select parts of a word, the word is still locked in as an entity. (Pro tip: For single-token entities, you can even double-click on the word!)
Surfacing the tokenization like this also lets you spot potential problems
early: if your text isn’t tokenized correctly and you’re updating your model
with token-based annotations, it may never actually learn anything meaningful
because it’ll never actually produce tokens consistent with the annotations. If
you’re using your own model and tokenization, you can pass in data with a
"tokens" property in Prodigy’s format
instead of using spaCy to tokenize.
As of v1.10, you can also set the --highlight-chars flag on ner.manual
to highlight individual characters instead of full tokens.
Why can't I highlight overlapping spans?
The manual interface for labelling spans was primarily designed for sequence
tagging tasks where the spans are represented as a sequence of token-based
tags with one tag per token. This is also how most NER model implementations are
designed and what makes them work so well: they expect each token to only have
one label that the model can predict. Under the hood, those tags often look like
B-PERSON (beginning of a person entity) or I-PRODUCT (token inside a product
entity).
Allowing overlapping spans in the annotation interface would easily be confusing and misleading, because you wouldn’t be able to use the data collected this way for the most common use cases. Aside from this, it’d also make the UI much more complex and there’s not really a satisfying answer for visualizing multiple nested overlapping spans while still making the interface efficient and intuitive to use.
For most use cases, there’s usually a better way to structure the task to avoid this problem. You could make multiple passes over the data if you have hierarchical labels. Or you could write a stream that keeps sending out the same example so you can label it multiple times until you reject it or send it back empty (which means all spans are added).
Character/Token-based highlighting toggle New: 1.14.5
The ner.manual recipe also lets you set a --highlight-chars flag to
allow highlighting individual characters instead of only tokens. As of v1.14.5
the flag adds a checkbox button to the UI for switching between character and
character based highlighting while annotating.
Character-based highlighting will only store the character offsets of your
annotation and won’t add a "tokens" property to the saved task.
Manual annotation with patterns
To annotate with patterns, you’ll need a patterns file, a spaCy pipeline for tokenization (or your own custom tokenizer) and a source of input text. In the following example, we used 100 match patterns for fashion brands. You can find the full code and data of this project in our projects repo.
fashion_brands_patterns.jsonl (excerpt)
Using the ner.manual, we can now stream in and annotate the data. All
pattern matches will be pre-highlighted in the UI, so we only need to make
corrections (unselect wrong or incomplete matches) and add the entities that the
patterns missed.
In about 2 hours, we collected 1735 annotations (1235 training examples, 500 evaluation examples). The trained spaCy pipeline with word vectors and pretraining achieved 82.1% accuracy on the task.
Working with patterns
Match patterns are typically provided as a JSONL (newline-delimited JSON) file and can be used to pre-highlight spans for faster and more efficient annotation. If you have words and phrases that you know are pretty much always an entity, you can use patterns so you only have to annotate the exceptions. Prodigy supports two types of patterns:
patterns.jsonl
-
Token patterns: These patterns are lists of dictionaries with one dictionary describing one token to match. The token attributes to match on can be the token’s
"text"or lowercase form"lower", but also lexical attributes like"is_punct"or linguistic features like"lemma"or"pos". You can find more details in the spaCy’s documentation on rule-based matching. -
String matches: If the pattern value is a string, it will be used for exact string matching. While
{"lower": "berlin"}matches “Berlin”, “berlin” and so on,"Berlin"will only match “Berlin”. The advantage of string patterns is that you don’t have to worry about the tokenization and whether the patterns describe the correct tokens. They also make it easy to re-use existing word lists and dictionaries.
Manual annotation with suggestions from a model
Using a model to suggest entities is a great way to bootstrap training data for named entity recognition. For example, most general-purpose models were trained on large corpora of news and web text, annotated with at least a few generic entity types. Even if what you need is slightly different, you can still take advantage of what the model already predicts and let it highlight suggestions for you.
Let’s say you want to train a model for financial news with labels for person
names, organizations, monetary amounts and
ticker symbols. This is a very
achievable task for named entity recognition. spaCy’s
English models already predict PERSON, ORG and
MONEY, so you can correct its suggestions for these labels and add annotations
for your new TICKER label.
Instead of labelling all texts and entity types from scratch, you only need to fill in the blanks and fix incorrect predictions. If the model is decent enough, this can save you a lot of time. The workflow is also very helpful if you’ve already trained a custom model and want to get a better feeling for its predictions and perform error analysis.
Binary annotation with active learning and a model in the loop
The binary ner.teach workflow implements uncertainty sampling with beam
search: for each example, the annotation model gets a number of analyses and
asks you to accept or reject the entity analyses it’s most uncertain about.
Based on your decisions, the model is updated in the loop and guided towards
better predictions. Even if you don’t update with the full gold-standard
annotation, confirming correct analyses and eliminating “dead ends” can very
quickly move the model towards the right answer, since all token-based tagging
decisions influence each other. Collecting binary feedback is also very fast and
allows the annotator to focus on one concept and decision at a time, reducing
the potential for human error and inconsistent data.
The following command starts the server and will make suggestions for the entity
type ORG. The progress indicator in the sidebar shows an estimate of how
much you still need to annotate until there’s nothing left to learn – or,
phrased differently, an estimate of when the loss is going to hit zero.
Try it live and accept or reject!
If the suggested entity is fully correct, you can hit accept. If
it’s entirely or partially wrong, you can hit reject. It’s
important to only accept suggestions that are fully correct. As of
v1.11, the ner.teach recipe will also ask you
about examples containing no entities at all, which can improve overall
accuracy of your model. So if you see an example with no highlighted
suggestions, you can accept it if the text contains no entities, or reject it if
it does contain entities of the labels you’re annotating.
The ner.teach recipe also supports match patterns via the
--patterns argument. Pattern matches will be mixed in with the suggestions
from the model and can help the model get over the “cold start” and make sure it
starts off with enough positive examples to make meaningful suggestions. This
can be used for entity types with very poor performance or even to add new
entity types to an existing model.
Should I accept or reject partially correct suggestions?
If you come across a partially correct suggestion – for instance the entity
“Facebook Inc” with only “Facebook” highlighted as a suggested ORG – you
should always reject them. The active learning-powered recipes will look at
all possible analyses for the parse, so the correct boundaries are likely in
there – it might just not be the suggestion you see first. By rejecting
incorrect boundaries, you’re essentially telling the model to try again, moving
it towards the correct boundaries. Each token can only be part of one entity, so
if you accepted a partial match like “Facebook” in “Facebook Inc”, the feedback
the model would get from this is “Yes, in contexts like this, ‘Facebook’ is a
single-token ORG entity and wins over all other possible analyses containing
this token.” That’s obviously not what you want.
Why am I seeing very high or very low scores?
The “score” field in the bottom right corner of the annotation card shows you the score of the current entity suggestion. Even though the recipe tries to present you with the most uncertain scores, it can sometimes happen that you see very different scores instead. So why does this happen?
Streams are generators and only operate on one batch at a time. They can also stream from huge files or potentially infinite sources of data, so Prodigy can’t just load it all into memory and keep sorting the whole stream. Instead, it uses an exponential moving average to decide whether to send out a score, based on the distribution of previous scores. This also prevents it from getting stuck if the model suddenly produces higher or lower scores. If the scores are confusing and the model isn’t producing meaningful suggestions, try collecting some gold-standard data first before switching to the binary workflow.
Why do I need to train again after annotating with a model in the loop?
When you annotate with a model in the loop, the model is also updated in the background. So why do you still need to train your model on the annotations afterwards, and can’t just export the model that was updated in the loop? The main reason is that the model in the loop is only updated once each new annotation. This is never going to be as effective as batch training a model on the whole dataset, making multiple passes over the data, shuffling on each epoch and using other deep learning tricks like dropout rates, compounding batch sizes and so on. If you batch train your model with the collected annotations afterwards, you should receive the same model you had in the loop, just better.
When I restart the recipe, do I start with the updated model or a blank model?
When you stop the recipe, the model in the loop is discarded and you can use
train to train a better version of it using your annotations. If you just
restart the recipe with the base model, it’ll start again at the beginning –
otherwise, Prodigy would have to first batch train it behind the scenes and you
might have to wait for quite a while until you can get started annotating. If
you want to start with the updated model, you can train it with your
annotations, output it to a directory and then initialize ner.teach with
the updated model:
prodigy train ./batch-trained-model --ner ner_dataset --base-model en_core_web_smprodigy ner.teach ner_dataset ./batch-trained-model ./data.jsonl --label PERSONTo prevent unintended side-effects, you typically want to train the base model
from scratch using all annotations every time you train – for example, you
want to update en_core_web_sm with all annotations from one or more
datasets and not update batch-trained-model, save the result, update that
again and so on.
Efficient annotation for transformers like BERT New: 1.10
Transformer models like BERT typically use subword tokenization algorithms like
WordPiece or Byte Pair Encoding (BPE) that are optimized for efficient embedding
of large vocabularies and not necessarily linguistic definitions of what’s
considered a “word”. If you’re creating training data for fine-tuning a
transformer, you can use its tokenizer to preprocess your texts to make sure
that the data you annotate is compatible with the transformer tokenization.
It also makes annotation faster, because your selection can snap to token
boundaries. The following recipe implementation uses Hugging Face’s easy-to-use
tokenizers library under the hood
and you can adjust it for your custom tokenization needs.
The recipe takes advantage of the "ws" property of each token to reflect
whether tokens are followed by whitespace or not. This way, the text stays
readable, even if words are split into several pieces. Setting
--hide--wp--prefix hides the prefix added to word pieces by the tokenizer so
the tokens are displayed as ["bi", "eber"] instead of ["bi", "##eber"]. You
can also set --hide-special to hide tokens like [CLS] and [SEP] instead of
just disabling them.
The data format produced by Prodigy retains the original texts and offsets
produced by the tokenizer, as well as the encoded IDs as "tokenizer_id".
JSON data format
Editing text during annotation New: 1.18.0
For some use cases, it can be helpful to edit the text of an example during span annotation, e.g. to fix mistakes, typos or formatting. Enabling --edit-text on ner.manual adds an edit button to the labels bar, which you can also toggle by pressing the shortcut command+e.
To save your edits, click the save button or press command+enter. Because changes in the text will also change the tokenization and potentially the existing spans, the recipe implements an event hook that’s called when text edits are saved. It receives the existing example and the new text, and re-generates the example JSON to reflect the edits.
Customizing how the task is being regenerated
Event hooks are Python functions provided by a recipe that can be called by the web app in JavaScript. You can use them to implement interactive logic in interfaces or to customize existing interfaces that support them.
The edit_text hook is called every time you save text edits and it receives the controller and the keyword arguments eg (the original example) and text (the new text). The keyword argument names match the keys of the data that’s sent from the web application, so you can’t change them. The function returns the updated example, which is then rendered by the annotation interface.
Default event hook in recipe
In your custom recipe, you can edit and adjust the event hook function to modify how the text edits are incorporated. You can also use a model to re-process the text and add pre-annotations. Keep in mind that the function runs every time text edits are saved, so it should be fast enough to not cause long loading times.
Editing text in a separate step
While editing during span annotation can be practical, it also adds more complexity and means you don’t get a chance to review the edits before spans are added. As an alternative approach, you can also break up the process in two steps: set up a custom recipe using the text_input interface with a pre-populated text field, save the edits to a dataset and then feed that to a recipe like ner.manual or ner.correct.
If you use "field_id": "text" for the text input, the edited text will be stored under the key "text" and the data will be directly compatible with text-based annotation recipes, which expect a key "text" in their JSON format.
Working with longer texts
You probably noticed that most of the examples on this page show short texts
like sentences or paragraphs. For NER annotation, there’s often no benefit in
annotating long documents at once, especially if you’re planning on training a
model on the data. Annotating with a model in the loop is also much faster if
the texts aren’t too long, which is why recipes like ner.teach and
ner.correct split sentences by default. NER model implementations also
typically use a narrow contextual window of a few tokens on either side. If
a human annotator can’t make a decision based on the local context, the model
will struggle to learn from the data.
That said, there are always exceptions, and if you’re using the
ner.manual workflow with whole documents, you can customize the
UI theme to fit more text on the screen. For
example:
prodigy.json (excerpt)
Prodigy will show you a little ↵ symbol to mark newlines, so you know where
they are in your raw text. Tokens that only contain newlines are also
unselectable by default, so you can’t accidentally include them in your
annotated spans and confuse your model this way. See the ner_manual
docs for
more details about newline tokens.
Splitting long documents into pages New: 1.17
Alternatively, you can also use pages to present your longer documents
split over multiple sections within the same annotation card. This can help reduce
cognitive load for the annotator, while also keeping related content together.
Pages can be provided as a list of "pages" following Prodigy’s
JSON task format, or generated automatically
from your data using the pages loader. For
more details and examples, see the documetation on custom pages.
Using a custom model
You don’t need to use spaCy to let a model highlight suggestions for you. Under
the hood, the concept is pretty straightforward: if you stream in examples with
pre-defined "spans", Prodigy will accept and pre-highlight them. This means
you can either stream in pre-labelled data, or write a custom recipe that uses
your model to add "spans" to the examples.
Expected format
For inspiration, see the
ner_make_gold.py
example recipe script that shows how to add spaCy entities to the stream of
incoming examples. For a custom model, the code could look like this:
Step 1: Write the stream generator
If you want to extract and add the entities at runtime, you can write a
custom recipe that loads the raw data, uses your custom
model to add "spans" to the stream, pre-tokenizes the text and then renders it
all using the ner_manual interface.
Step 2: Putting it all together in a recipe
Tip: Converting BILUO tags to character offsets
If your model only outputs token-based BILUO tags and doesn’t give you the
character offsets, you can use spaCy’s
biluo_tags_to_offsets helper
to quickly convert the tokens and tags to character offsets. The function
returns a list of (start, end, label) tuples that you can use to pre-populate
the "spans" in Prodigy.
from spacy.tokens import Docfrom spacy.vocab import Vocabfrom spacy.training import biluo_tags_to_offsets
doc = Doc(Vocab(), words=["I", "like", "New", "York"])tags = ["O", "O", "B-LOC", "L-LOC"]offsets = biluo_tags_to_offsets(doc, tags)  # [(7, 15, 'LOC')]
Why is the text tokenized, and how can I solve mismatched tokenization?
Pre-tokenizing the text for the manual interfaces allows more efficient annotation, because the selection can “snap” to the token boundaries and doesn’t require pixel-perfect highlighting. You can try it out in the live demo – even if you only select parts of a word, the word is still locked in as an entity. (Pro tip: For single-token entities, you can even double-click on the word!)
Surfacing the tokenization like this also lets you spot potential problems early: if your text isn’t tokenized correctly and you’re updating your model with token-based annotations, it may never actually learn anything meaningful because it’ll never actually produce tokens consistent with the annotations.
If you’re using your own model and tokenization, you can pass in data with a
"tokens" property in Prodigy’s format
instead of using spaCy to tokenize. Prodigy will respect those tokens and split
up the text accordingly. If you do want to use spaCy to train your final model,
you can
modify the tokenization rules
to match your annotations or set skip=True in the
add_tokens preprocessor to just ignore the
mismatches.
Active learning with a custom model
If you want to update your model in the loop as you annotate, make sure you pick an implementation that supports updates in small batches and that’s sensitive enough to small updates (since you want your annotations to have an effect).
Step 1: Use the model to predict and score entities
On their own, the scores and examples aren’t that interesting yet – you
typically want to use the scores to only select the most relevant examples for
annotation. In the built-in ner.teach recipe, we’re using beam search to
get a number of different possible analyses and then use the prefer_uncertain
sorter that takes the stream of
(score, example) tuples and yields example dicts with scores closest to
0.5.
Step 2: Sort the stream by score
Step 3: Update the model with answers
By default, Prodigy streams are generators and Prodigy will only ever ask for
the next batch from the stream. So as you annotate and update the model, future
batches will receive scores from your updated model in the loop. For a
simplified example of that loop, check out the
textcat_custom_model.py
recipe script. It shows a text classification use case, but the principle is
very similar and is illustrated using a dummy model that “predicts” random
numbers.
Step 4: Putting it all together in a recipe
Training NER models
Once you’ve labelled some data with Prodigy, you can start your training
experiments. If you’ve collected annotations from different sources or multiple
annotators, it’s often a good idea to use the review recipe to resolve
any conflicts and double-check the data. It’s also recommended to create a
separate, dedicated evaluation set that you can compare different approaches
against.
-
Train a spaCy pipeline using Prodigy’s CLI. The
trainrecipe is a wrapper around spaCy’s training API and optimized for training straight from Prodigy datasets and quick experiments. It reads from a dataset, holds back data for evaluation and outputs nicely-formatted results. This workflow is the best choice if you just want to get going or quickly check if you’re “on the right track” and your model is learning things. -
Train a model with spaCy directly. Once you’re getting more serious, it often makes sense to train your model directly with the library you’re using – e.g. spaCy. This gives you more control over the training process and hyperparameters, and lets you train all model components at once. The
data-to-spacycommand lets you convert Prodigy datasets to spaCy’s format and auto-generates a config to use with thespacy traincommand. It’s recommended to use thereviewrecipe on the different annotation types first to resolve conflicts properly. To check if your data is valid and contains no issues, you can run spaCy’sdebug-datacommand. -
Train a model with any other implementation or framework. The
db-outexports annotations in a straightforward JSONL format. Entity spans are provided as a list of"spans"with their respective start and end character offsets, and the entity label. This should make it easy to convert and use it to train any model. If you annotated using a manual interface, the data will also include a"tokens"property so you can restore the tokenization.
Should I start with a blank model or update an existing one?
spaCy’s NER architecture was designed to support continuous updates with more
examples and even adding new labels to existing trained models. Updating an
existing model makes sense if you want to keep using the same label scheme and
only want to fine-tune it on more data or more specific data. However, it can
easily lead to inconsistent behavior if you’re adding new entity types and/or
annotations that conflict with the data the model was trained on. For instance,
if you suddenly want to predict all cities as CITY instead of GPE. Instead
of trying to “fight” the existing weights trained on millions of words, it often
makes more sense to train a new model from scratch.
Even if you’re training from scratch, you can still use a trained model to help
you create training data more efficiently. Prodigy’s ner.correct will
stream in the model’s predictions for the given labels and lets you manually
correct the entity spans. This way, you can let a model label the entity types
you want to keep, add your new types on top, and make corrections along the way.
This is a very effective method for bootstrapping large gold-standard training
corpora without having to do all the labelling from scratch.
Tip: Converting character offsets to BILUO or IOB tags
If your training process needs token-based BILUO or IOB tags instead of
character offsets, you can use spaCy’s
biluo_tags_from_offsets helper
or the
Token.ent_iob_ and Token.ent_type
attributes to to quickly convert the annotations.
import spacyfrom spacy.gold import biluo_tags_from_offsets
text = "I like New York City"spans = [{"start": 7, "end": 20, "label": "LOC"}]nlp = spacy.blank("en")doc = nlp(text)
offsets = [(span["start"], span["end"], span["label"]) for span in spans]biluo_tags = biluo_tags_from_offsets(doc, offsets)# ['O', 'O', 'B-LOC', 'I-LOC', 'L-LOC']doc.ents = [doc.char_span(start, end, label) for start, end, label in offsets]iob_tags = [f"{t.ent_iob_}-{t.ent_type_}" if t.ent_iob_ else "O" for t in doc]# ['O', 'O', 'B-LOC', 'I-LOC', 'I-LOC']
Improving accuracy and using transfer learning
After you’ve done your initial annotations and run your first training process, you’ll usually be interested in improving the accuracy of your model. After all, you’re unlikely to get to 100% accuracy right away – and if you ever do, that’s probably a sign that something’s wrong! Here are the steps we generally recommend to improve your initial accuracies:
-
Check if you just need more data. The
train-curverecipe is a helpful utility for checking if your model would improve with more data. It takes the same arguments as thetrainand will train with different samples of the data – for instance, 25%, 50%, 75% and 100%. As a rule of thumb, if accuracy improves within the last segment, it could indicate that more annotations of the same type will improve the model. -
Initialize with word vectors. Using pretrained word embeddings to initialize your model is easy and can make a big difference. If you’re using spaCy, try using the
en_core_web_lgmodel as the base model. If you’re working with domain-specific texts, you can train your own vectors and create a base model with them. -
Initialize with pretrained tok2vec weights or transformer embeddings. Transfer learning has proven to be a very effective way to “share” knowledge between tasks, by initializing models with pretrained representations. Transfer learning is quite easy to use, but there are a few steps in the workflow. For an end-to-end example, check out this project with code, data and downloadable weights. Compared to just training with word vectors, an NER model trained on the same data achieved +8.7% accuracy. You can use spaCy’s config generator or
init configcommand to generate a config for a transformer-based pipeline, anddata-to-spacyto export your annotations for training.