Prodigy Modal
To streamline the process of running Prodigy in a cloud environment, we’ve developed an integration with serverless cloud platform Modal. Modal is a natural fit for Prodigy, as it can be fully configured directly from Python, allowing for seamless interaction with the Prodigy backend, as well as custom recipes, data loaders, and databases. The Prodigy Modal plugin offers the following recipes:
modal.setup | Generates a Python file containing the Modal script with the cloud function definition. This script can be used directly with Modal’s modal run, modal serve and modal deploy commands. |
modal.run | A wrapper around modal run. It generates a Modal script and executes a Prodigy command as an ephemeral app on the Modal cloud. The ephemeral app stops when the Prodigy command exits. This recipe is intended for terminal-only Prodigy commands, like train or the model.annotate family of recipes. |
modal.serve | A wrapper around modal serve. It generates a Modal script and serves Prodigy as an ephemeral app in Modal’s cloud. The cloud function stops if Prodigy raises an error. This recipe is useful for testing the Prodigy endpoint on Modal before fully deploying it. |
modal.deploy | A wrapper around modal deploy. It generates a Modal script and deploys the Prodigy app as a web endpoint in the Modal cloud. |
Installation
This plugin is designed specifically for use with the Modal cloud service provider. Ensure you have a Modal account and the Modal client installed before proceeding. You can find detailed setup instructions here. To use the Modal plugin, make sure you have Prodigy installed with the appropriate extras:
Quickstart
I want to deploy Prodigy remotely in a single command.
If you are happy with the standard setup of the Modal infrastructure, you can use Prodigy modal.deploy
to directly deploy Prodigy in the Modal cloud. You just need to make sure that all the files required by your recipe
live in a single --assets folder. Please see the modal.deploy command for details.
I want to customize my Modal deployment setup.
If you need to modify some parts of Prodigy Modal script e.g change the default container image or specify the GPU count, you can use modal.setup to generate the starter script and edit it according
to your needs. When ready, you can use Modal CLI modal serve path/to/modal/script to serve Prodigy as an ephemeral app in the dev mode or modal deploy path/to/modal/script to deploy it as a web endpoint.
How do I get started with Modal?
- Head over to Modal website and create a user account. You can skip the usual first step of installing the Modal’s client as it comes pre-installed with the Prodigy company plugins.
- Set up a Modal API token for authentication:
- Run a Prodigy Modal recipe
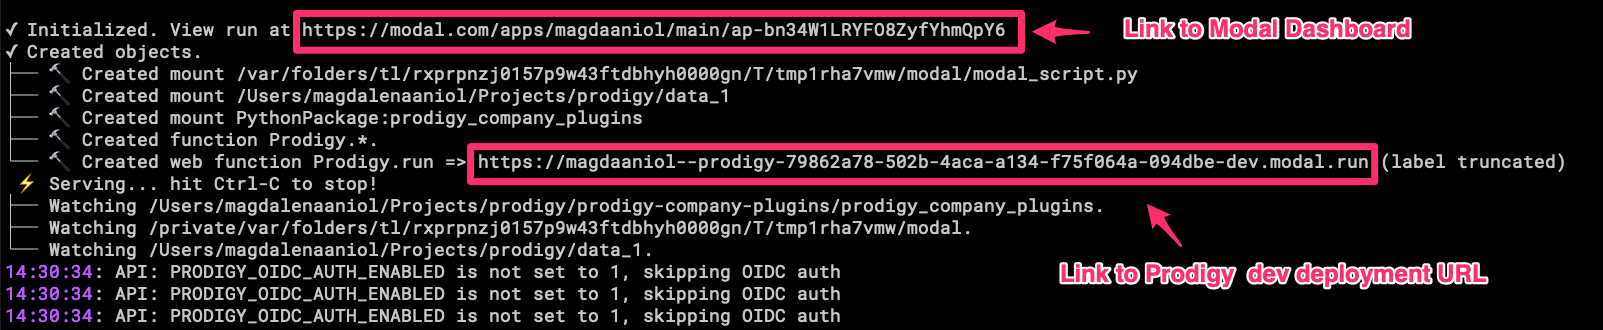
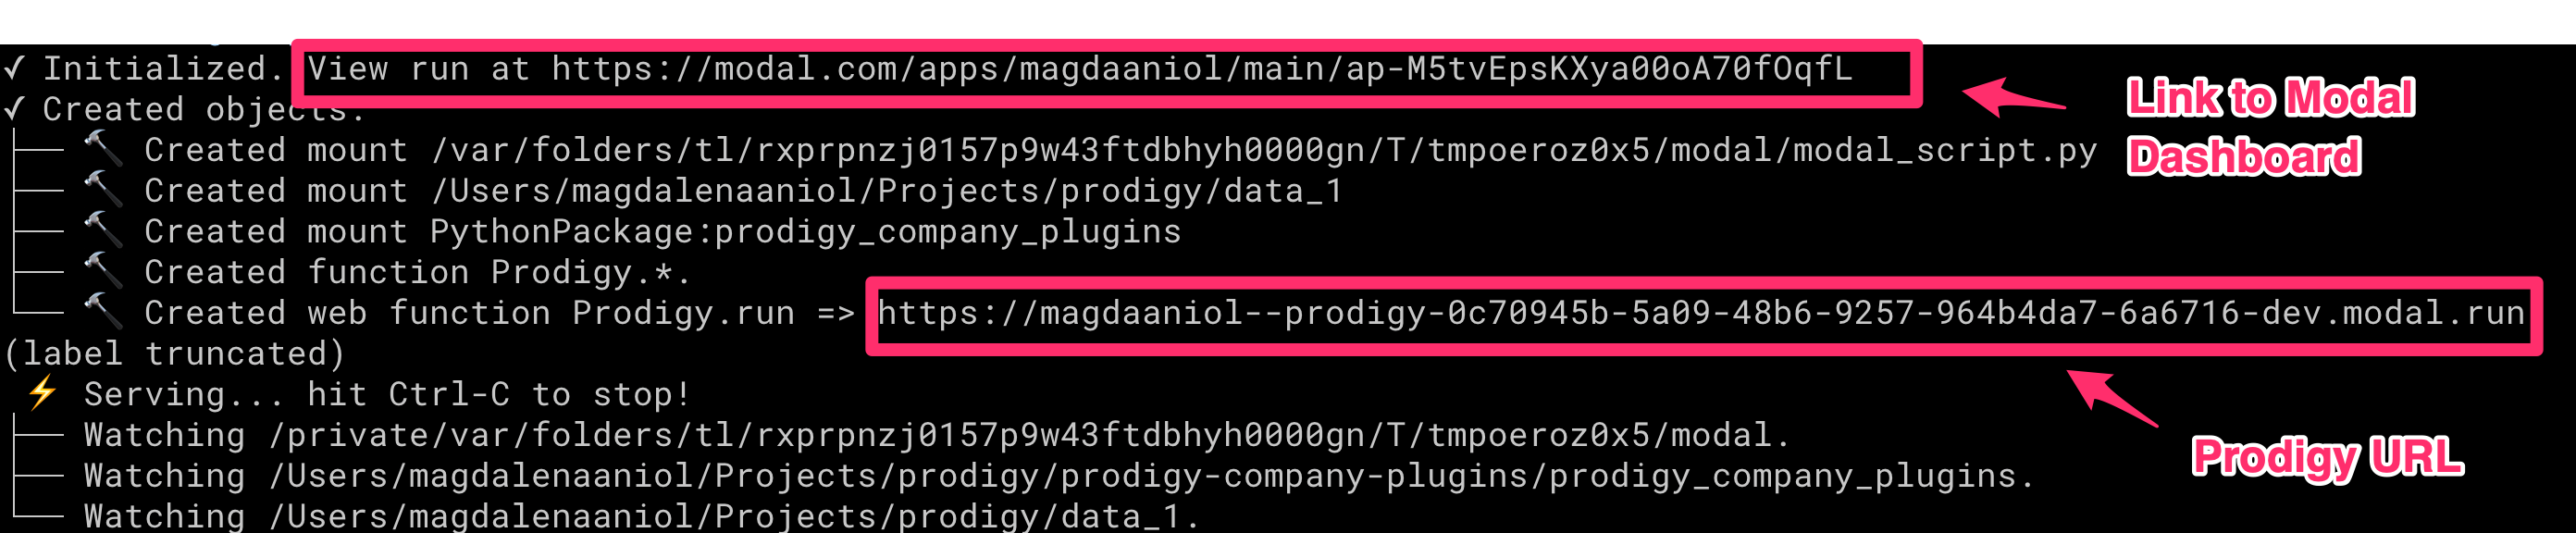
Check the terminal for the URL of the Modal dashboard to find the URL where Prodigy UI can be accessed. Please see some additional information on database persistence and security considerations below.
Using the Prodigy Modal Plugin
Using Prodigy with Modal generally consists of two steps:
- Generate a Python script that defines the cloud function to be executed in Modal.
- Trigger the cloud function. Depending on the recipe used, the function can be:
- launched as a web endpoint in development mode (
modal.serve) - deployed as a full-fledged app (
modal.deploy) - executed as a command without starting a web endpoint (
modal.run)
- launched as a web endpoint in development mode (
These steps can be decoupled, in case further customization of the Modal script is required. In such scenarios, the modal.setup recipe should be used.
For Modal native experience, you can also use the script generated by modal.setup recipe directly with the Modal CLI. It is recommended to first test the deployment in development mode before sharing the web endpoint link with annotators.
Creating a Modal setup file
To create a Modal script file without executing anything, use the modal.setup recipe:
This command generates a modal_setup.py in the present working directory (or the directory specified with the --output argument). This file contains the specification of the Modal cloud function as well as instruction on how the Prodigy image should be built and how to store any outputs such as model weights in case Prodigy train is used.
Storage
By default, a Modal volume named prodigy-vol is created at the remote path /vol/prodigy_data/. Model weights are stored in the models directory within this volume. Users can create additional folders relative to the prodigy-vol path (/vol/prodigy_data). This path can be used as output folder in any Prodigy command. See the terminal-only commands section for more details on custom storage. It’s also possible to interact with Modal volumes via web-based Modal dashboard or, very conveniently, via Modal CLI.
Importantly, all the resources such as input JSONL files, local base models, spaCy config files as well as extra Python code (used with -F) should be placed
in the directory specified under --assets argument. This is how you can tell Prodigy which resources should be copied over to the Modal Prodigy image.
Similarly, when using spacy-llm workflows with cache, it’s worth specifying the path to cache directory on the volume e.g.
spacy-llm config excerpt
Deploying Prodigy as a web endpoint on Modal
To create the setup file and immediately deploy Prodigy on Modal in “production” mode, use the modal.deploy recipe:
This command creates the Modal setup file and triggers the cloud function deploying your Prodigy annotation project on Modal. With this recipe, you can optionally persist the Modal script. Please note that the script will serialize all environment variable values, so it should be considered a sensitive file.
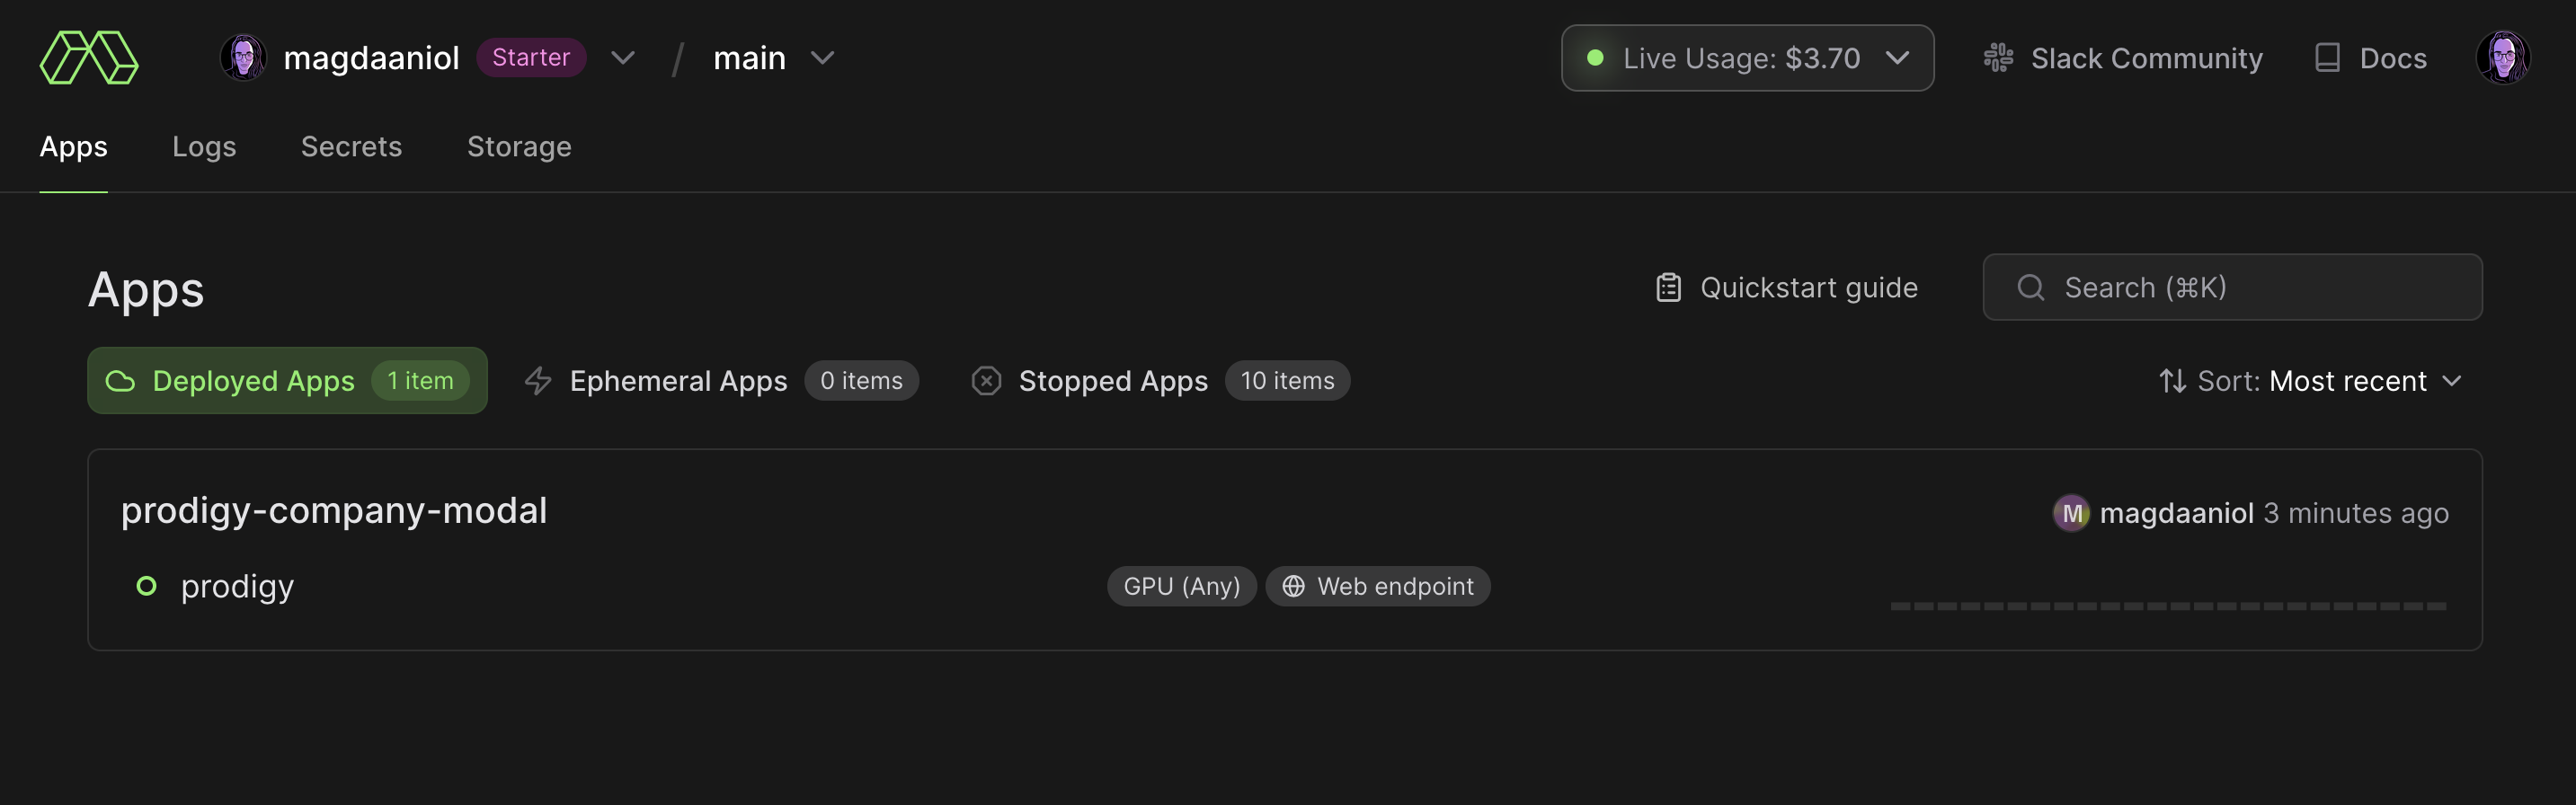
After a successful deployment, the modal.deploy recipe will output a URL where your Prodigy instance is accessible. You can share this URL with your annotators to begin the annotation process. The Prodigy URL is available either in the terminal stdout or on the Modal dashboard.
It is recommended to test the Prodigy endpoint before fully deploying it. For this, you can use prodigy.serve. This recipe will serve Prodigy as an ephemeral app with the -dev prefix in the URL. Prodigy app logs will be forwarded to your local terminal, and you can stop the app with ctrl+C. The ephemeral app will automatically stop if Prodigy throws an error, overriding the default Modal serve behavior, which would restart the function.
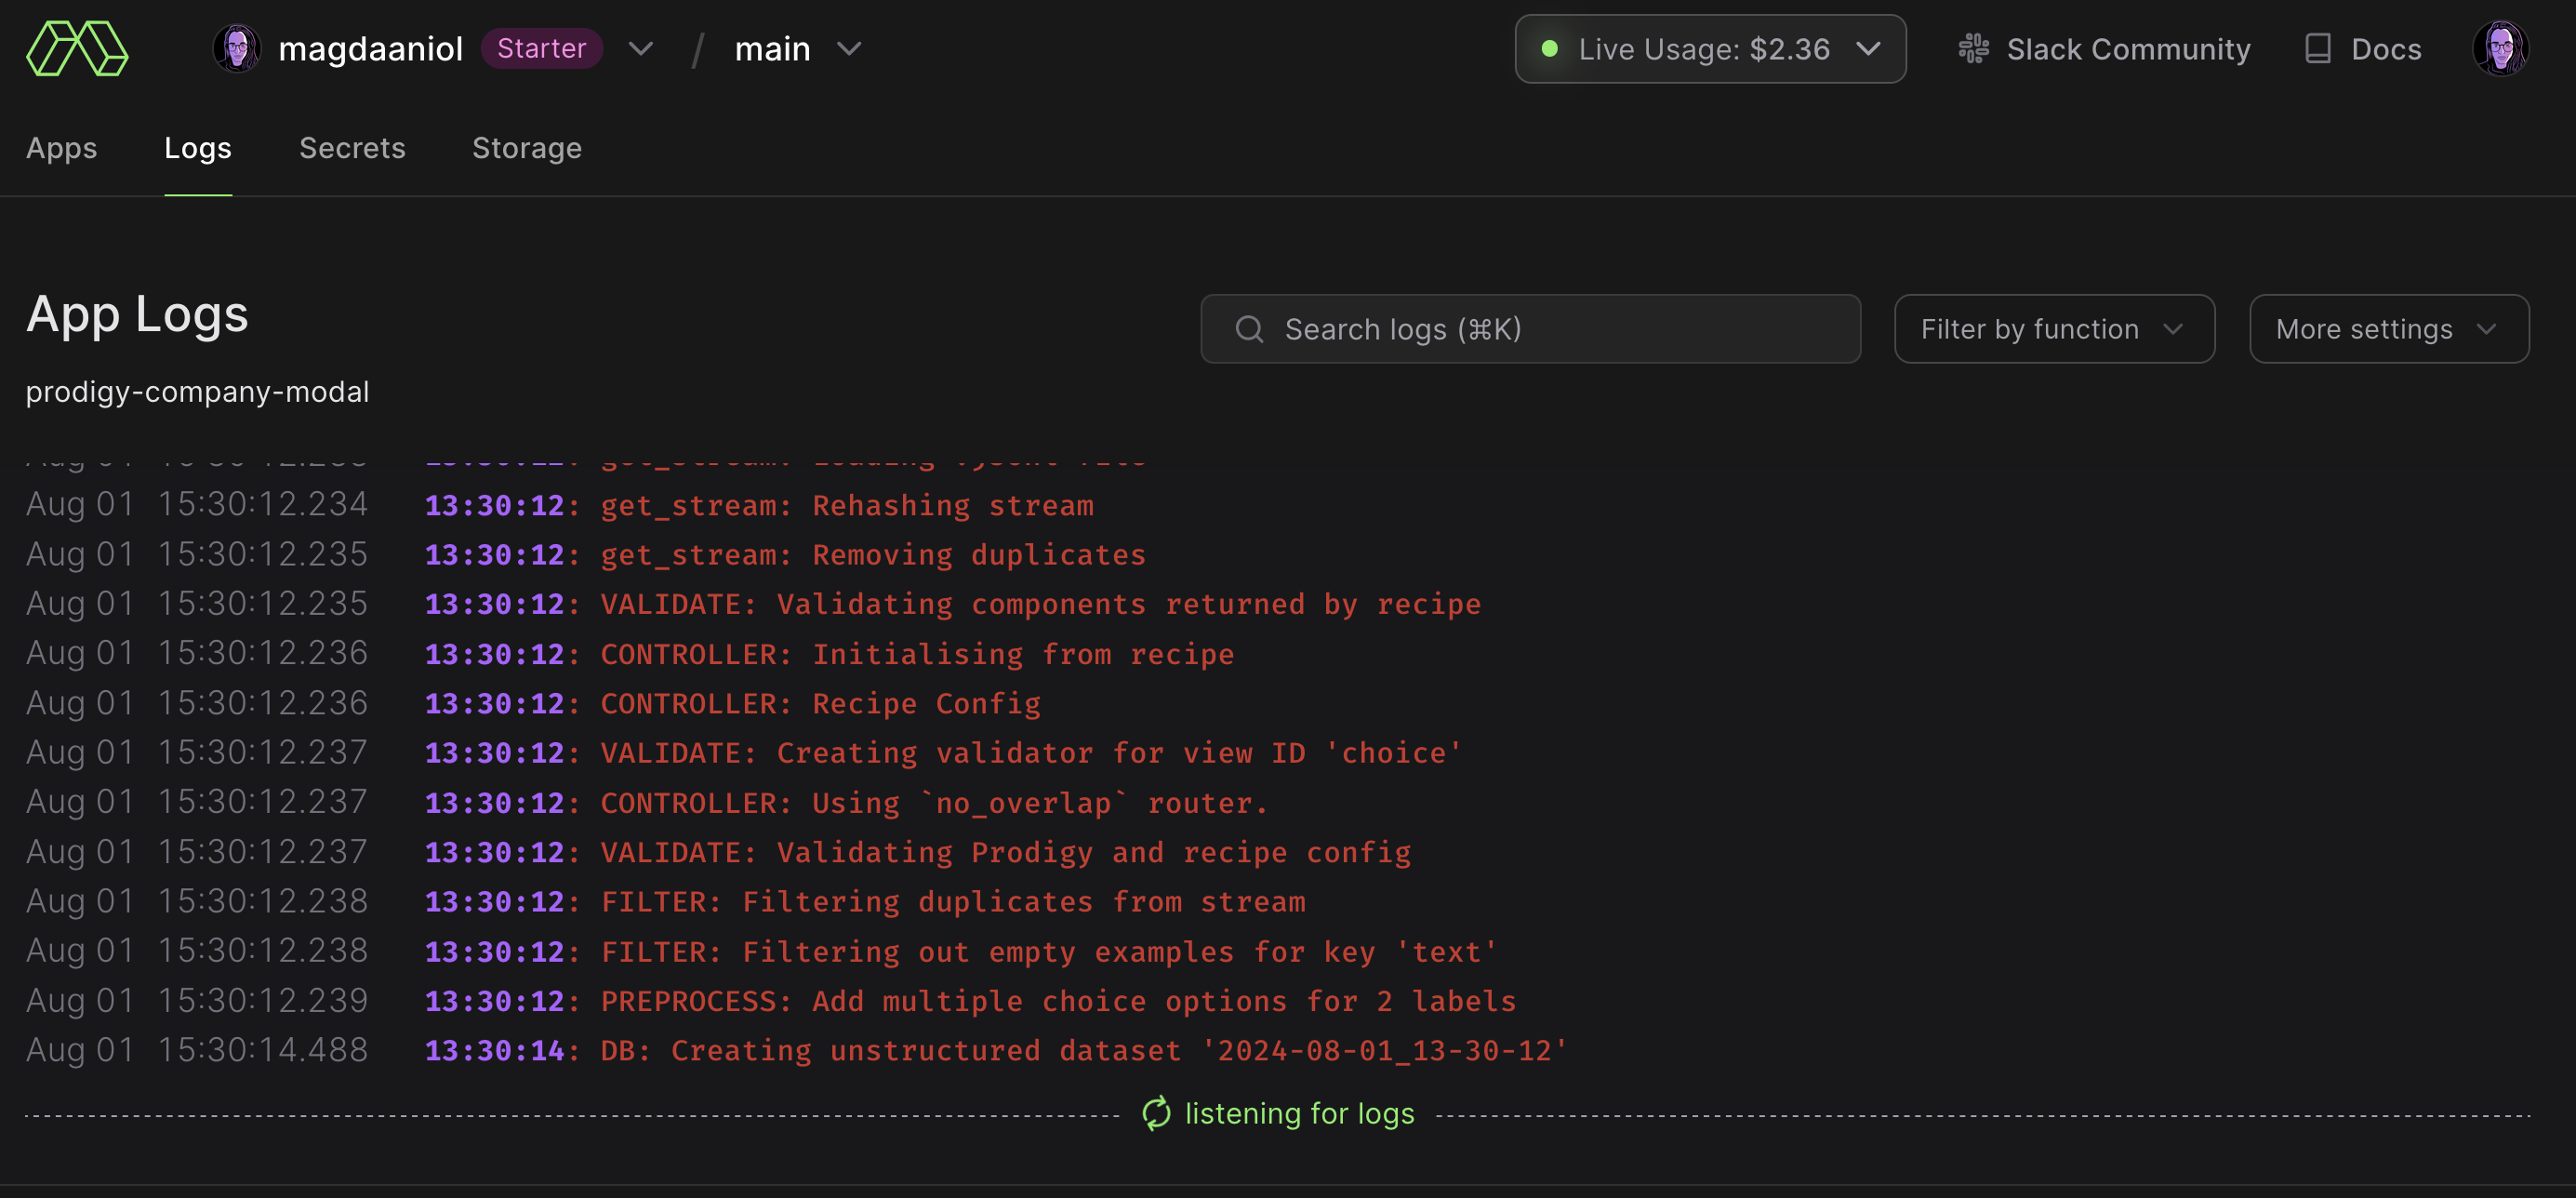
For a fully deployed app, the process is automatically detached from your local terminal, and you can inspect the logs, as well as start and stop the app, from your Modal dashboard.
Persisting the database
Modal can serve your Prodigy instance, store your data and model weights while the app is running, but it won’t persist the default Prodigy SQLite database. For this reason it is recommended to
set up a remote Postgres database that works independent of Modal.
We recommend Neon for this purpose. It’s quick to set up and you can instruct Prodigy to use it via prodigy.json:
prodigy.json (excerpt)
Executing terminal-only recipes in Modal
For Prodigy commands that do not require an annotation server (e.g., train), modal.run should be used to avoid launching the web endpoint when it’s not needed.
Similar to modal.serve and modal.deploy, this recipe will generate the script and use the Modal run command to execute it.
As with modal.serve, the logs are tailed to the local terminal. For long-running functions, such as training, it is recommended to use the --detach option to prevent the function from stopping if the local terminal is shut down. Detached functions can be controlled from the Modal dashboard. Unlike undetached functions, which stop the Modal container when the function exits, detached functions must be explicitly stopped from the dashboard.
By default, trained models are stored in prodigy-vol Modal volume, under the models folder. However, you can define a custom folder relative to the default path. For example, models trained with the command above will be stored in prodigy-vol/models/experiment_123. This path is relevant when browsing volumes in the Modal dashboard under the Storage tab.
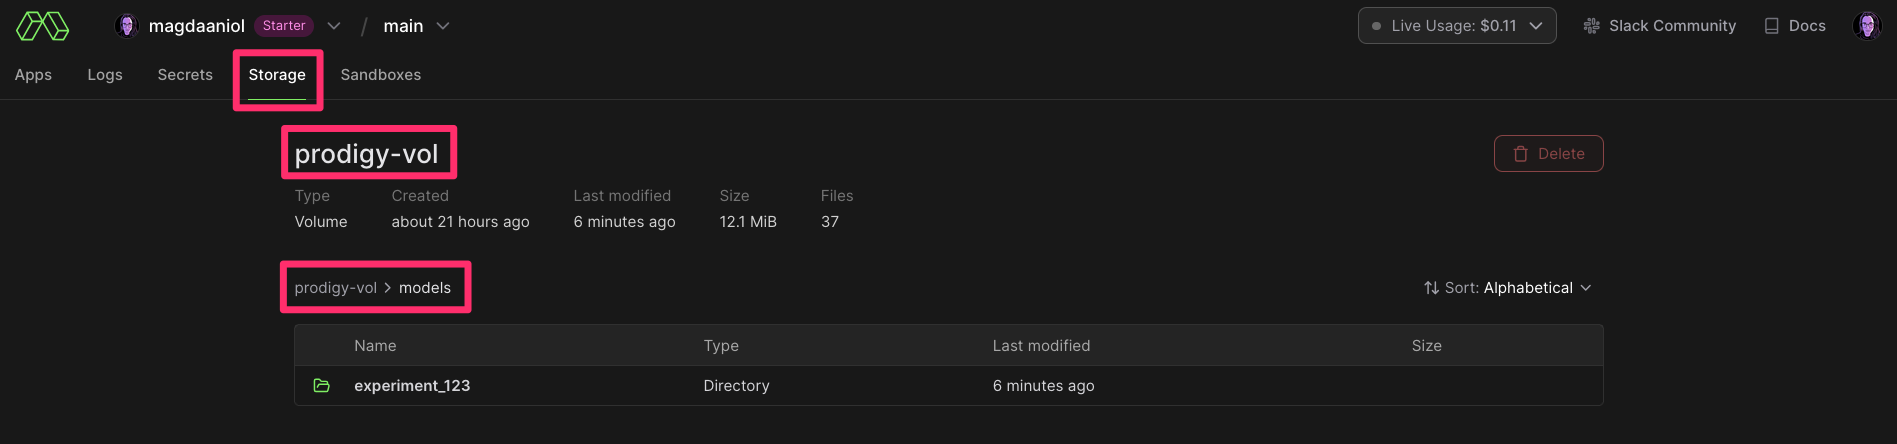
If the model stored in Modal volumes is supposed to be used as the base-model for another training experiment, it is possible to specify the programatic path this volume like so: /vol/prodigy_data/models/experiment_123, where /vol/prodigy_data/ corresponds to the prodigy-vol volume:
As mentioned above, Modal volumes come with a full CLI interface, wehere the files can be listed, copied, moved and removed across different directories and volumes.
Example workflows
Common setup: DB configuration
As mentioned in the DB persistence section, it is necessary to configure Prodigy to use a persistent database outside the Modal environment. The recommended setup is a cloud PostgreSQL database, such as Neon. You can find information on setting up Prodigy with a PostgreSQL database here.
Make sure you provide the DB config in the global or local prodigy.json file.
Common setup: Environment variables definition
Prodigy Modal recipes require the Prodigy license to be provided as the PRODIGY_LICENSE_KEY environment variable. Similarly, all other environment variables that your recipe requires, such as API keys or SSO variables, should be exported and available in your local environment. The easiest way to manage this is by defining all environment variables in an .env file and using dotenv to load them before invoking modal.setup, modal.run, modal.serve, or modal.deploy.
Example 1: Deploy a built-in Prodigy recipe for multiple annotators with basic authentication
-
Define the target postgres DB and the required overlap in the global or local
prodigy.jsonconfiguration file:prodigy.json (excerpt)
{"db": "postgresql","db_settings": {"postgresql": {"dbname": "prodigy","user": "prodigy_owner","password": "XXXXXX","host": "your-db-host"}},"feed_overlap": true} -
Enable basic HTTPS authentication via environment variables defined in the
.envfile:.env
PRODIGY_LICENSE_KEY="XXXX-XXXX-XXXX-XXXX"PRODIGY_ALLOWED_SESSIONS="alice,bob,steve"PRODIGY_BASIC_AUTH_PASS="password"PRODIGY_BASIC_AUTH_USER="user"PRODIGY_LOGGING="basic" -
Create a local
assetsdirectory with all local resources requried by the recipe such as e.g. input dataset, patterns files etc. -
Call
modal.serveto test the Prodigy instance. -
Check the terminal output for the links to the Modal dashboard and Prodigy web endpoint.
Since we have constrained the allowed sessions via the PRODIGY_ALLOWED_SESSIONS env var, the annotator will have to access the Prodigy server with the ?session=XXX attached to the base URL, e.g.
https://YOUR_URL.modal.run/?session=alice.
You can inspect the logs, start and stop Prodigy web app either from your terminal or the Modal dashboard.
Once the the testing is finished, you can deploy the app with modal.deploy.
Example 2: Train a transformer-based spaCy pipeline on GPU
-
Define the target postgres DB in the global or local
prodigy.jsonconfiguration file:prodigy.json (excerpt)
{"db": "postgresql","db_settings": {"postgresql": {"dbname": "prodigy","user": "prodigy_owner","password": "XXXXXX","host": "your-db-host"}}} -
Provide Prodigy license key and other environment variables via
.envfile:.env
PRODIGY_LICENSE_KEY="XXXX-XXXX-XXXX-XXXX"PRODIGY_LOGGING="basic" -
Create a local
assetsdirectory with all local resources requried by the recipe such as e.g. the spaCy training config file. If you need any third party libraries, make sure to specify them inrequrements.txtand pass the path to it via--requirementsargument.spacy[cuda12x,transformers]is installed by default in the image if the--require-gpuflag is used. -
Since the Prodigy web application is not required for training the model, call
modal.runwith the--detachoption to detach it from the local terminal:
Note that we are not specifying the output directory of the train recipe. The model weights will be saved in Modal’s volumes storage functionality. The default volume name is prodigy-vol (you can change it by editing the Modal script). If you specified the output directory for the models, it would be created relative to the default models directory in prodigy-vol volume.
Once the training has finished, you can access the trained models either via the Modal dashboard or the Modal CLI. For example, you can download to models to your machine:
You can interact with volumes either by Modal dashboard or via the Modal CLI, for example, to list the current content of the prodigy-vol. For more commands to operate on volumes, see the Modal volume CLI docs.
Example 3: Deploy a custom Prodigy recipe with SSO
-
Define the target Postgres DB in the global or local
prodigy.jsonconfiguration file:prodigy.json (excerpt)
{"db": "postgresql","db_settings": {"postgresql": {"dbname": "prodigy","user": "prodigy_owner","password": "XXXXXX","host": "your-db-host"}}} -
Provide Prodigy License and SSO environment variables via
.envfile:.env
PRODIGY_LICENSE_KEY="XXXX-XXXX-XXXX-XXXX"PRODIGY_OIDC_AUTH_ENABLED="1"PRODIGY_DEPLOYED_URL="https://MODAL_SPACENAME--ner-annotation-project.modal.run"PRODIGY_OIDC_DISCOVERY_URL="https://your-oidc-provider/.well-known/openid-configuration"PRODIGY_OIDC_CLIENT_ID="xxxxxxxxxxxxxxx"PRODIGY_OIDC_CLIENT_SECRET="xxxxxxxxxxx"PRODIGY_LOGGING="basic"PRODIGY_DEPLOYED_URLwill be the URL generated by Modal. It can be customized using the--modal-function-labeloption. Modal offers custom domains for team and enterprise plans. Custom domain can be configured from Prodigy CLI as well. -
Create a local
assetsdirectory with all local resources requried by the recipe such as e.g. the custom Prodigy recipe code. Make sure thePRODIGY_DEPLOYED_URLi.e. the URL generated by Modal for your Prodigy deployment is included as “allowed callback URLs” in your OIDC provider settings as explained here -
Call
modal.deploy. Now, accessing thePRODIGY_DEPLOYED_URLshould trigger the usual SSO workflow.
API
modal.setup command
Generates a Modal script for executing Prodigy command in Modal’s cloud service. It uses arguments provided via CLI as well as environment variables to define the Prodigy container and Prodigy app in Modal.
| Argument | Type | Description | Default |
|---|---|---|---|
command | str | Prodigy command to run in Modal environment. Don’t forget to quote it as a string. | |
--assets, -A | str | Path to the directory that contains all data, models and code files required to run the recipe. | None |
--requirements, -r | str | Path to the requirements file to be installed in Modal environment. Should be relative to --assets. | None |
--output, -O | str | Output directory to save Modal script. If not provided, the files will be written to the current working directory. | None |
--require_gpu, -G | bool | Require GPU to run the recipe. Necessary for workflows with transformers in the loop. | False |
--modal-gpu, -MG | str | Modal GPU configuration shortcode. Ignored if require_gpu is False. | any |
--modal-function-label, -MFL | str | Label for the Modal function. | "" |
--modal-custom-domains, -MCD | str | Comma-separated custom domains for the Modal deployment. | [] |
--server, -S | bool | Deploy Prodigy as web endpoint. | False |
--timeout, -T | int | Timeout for the modal non-web function in seconds. Only relevant when --server is not set. | 18000 |
modal.serve command
Serve Prodigy as an ephemeral app in Modal’s serverless cloud. Recommended for testing the Prodigy endpoint on Modal before fully deploying it.
| Argument | Type | Description | Default |
|---|---|---|---|
command | str | Prodigy command to execute in Modal environment. Don’t forget to quote it as a string. | |
--assets,A | str | Path to the directory that contains all data, models and code files required to run the recipe. | None |
--requirements, -r | str | Path to the requirements file to be installed in Prodigy container in Modal. | None |
--persist, -P | bool | Persist Modal python script (modal_script.py) on disc. If set Modal script will be stored in urrent working directory. Otherwise, it will be written to a temporary directory an deleted. | False |
--require-gpu, -G | bool | Require GPU to run the recipe. Necessary for workflows with transformers in the loop. | False |
--modal-gpu, -MG | str | Modal GPU configuration shortcode. Ignored if require_gpu is False. | any |
--modal-function-label, -MFL | str | Label for the Modal function. | "" |
--modal-custom-domains, -MCD | str | Comma-separated custom domains for the Modal deployment. | [] |
modal.deploy command
Deploy Prodigy as a web endpoint in Modal’s serverless cloud.
| Argument | Type | Description | Default |
|---|---|---|---|
command | str | Prodigy command to execute in Modal environment. Don’t forget to quote it as a string. | |
--assets,A | str | Path to the directory that contains all data, models and code files required to run the recipe. | None |
--requirements, -r | str | Path to the requirements file to be installed in Prodigy container in Modal. | None |
--persist, -P | bool | Persist Modal python script (modal_script.py) on disc. If set Modal script will be stored in the current working directory. Otherwise, it will be written to a temporary directory an deleted. | False |
--require-gpu, -G | bool | Require GPU to run the recipe. Necessary for workflows with transformers in the loop. | False |
--modal-gpu, -MG | str | Modal GPU configuration shortcode. Ignored if require_gpu is False. | any |
--modal-function-label, -MFL | str | Label for the Modal function. | "" |
--modal-custom-domains, -MCD | str | Comma-separated custom domains for the Modal deployment. | [] |
modal.run command
Run a Prodigy terminal command in Modal cloud without spinning up the annotation server.
| Argument | Type | Description | Default |
|---|---|---|---|
command | str | Prodigy command to execute in Modal environment. Don’t forget to quote it as a string. | |
--assets,A | str | Path to the directory that contains all data, models and code files required to run the recipe. | None |
--requirements, -r | str | Path to the requirements file to be installed in Prodigy container in Modal. | None |
--persist, -P | bool | Persist Modal python script (modal_script.py) on disc. If set Modal script will be stored in the current working directory. Otherwise, it will be written to a temporary directory an deleted. | False |
--require-gpu, -G | bool | Require GPU to run the recipe. Necessary for workflows with transformers in the loop. | False |
--modal-gpu, -MG | str | Modal GPU configuration shortcode. Ignored if require_gpu is `False. | any |
--modal-function-label, -MFL | str | Label for the Modal function. | "" |
--timeout, -T | int | Timeout for the Modal function in seconds. | 18000 |
--detach, -D | bool | Detach Modal process from local terminal. | False |