Computer Vision
Prodigy comes with built-in annotation interfaces for common computer vision tasks such as object detection, image segmentation and image classification. You can boost your annotation efforts by plugging in statistical models with Prodigy’s custom recipes for powerful human-in-the-loop and active-learning workflows.
Quickstart
I want to draw bounding boxes and polygons with labels onto images.
Prodigy’s built-in image.manual recipe is the easiest way to get started.
It lets you load in a directory and define one or more labels to annotate. In
the image_manual UI you can then draw bounding boxes and polygon
shapes. For more details and examples, see this section.
I want to review and correct existing bounding box annotations.
Prodigy’s image.manual recipe supports loading images from a directory,
or from a JSONL file containing image URLs. You can read more about it
in this section. If you have existing bounding box annotations,
you can convert them to Prodigy’s format,
load them in and update the annotations. Also see
this helper function for converting bounding box
coordinates. The image_manual interface currently supports moving
existing boxes using keyboard shortcuts, changing labels of existing shapes and
removing and re-adding shapes.
I want to assign one or more categories to images.
For binary categories (i.e. to annotate whether one label applies or not), you
can use the mark recipe with the classification UI, a --label
of your choice and a directory of images with the image loader. See the docs on
binary image classification for more details and an
example.
If you want to choose from multiple labels (or assign multiple labels at the
same time), you can write a custom recipe using the
choice interface. See the docs on image classification with multiple
labels for more details and example code.
I want to annotate content and layout features of PDFs or scans.
Prodigy lets you load in documents as images and annotate bounding boxes and shapes using image_manual UI. You can also use the pages interface to group multi-page documents together within the same efficient interface. The Prodigy-PDF plugin extends Prodigy with more workflows for loading and visually annotating PDFs, as well as OCR (Optical Character Recognition) to extract text-based content.
I want to plug in my own image model.
Prodigy lets you write custom recipes to script your own
annotation workflows in Python. If you can load your image model and extract
predictions from it in Python, you can plug it into Prodigy. Prodigy represents
annotation tasks using a simple JSON format. If
your model predicts labels for the whole image, you can add them to each
annotation task and annotate whether the predicted labels are correct. If your
model predicts bounding boxes, you can add them as "spans" and manually
correct the result, or accept or reject the individual bounding boxes. See the
section on custom models for more details and inspiration.
For an end-to-end example using Prodigy with TensorFlow object detection API to annotate with a model in the loop, check out this section (or go straight to the tutorial).
Manual annotation of bounding boxes and image segments
The image.manual recipe lets you load images from a directory and add
bounding boxes and polygon or freeform shapes for one or more labels. You can
click and drag to draw boxes, or click anywhere on the canvas to add polygon
points. Polygon shapes can also be closed by double-clicking when adding the
last point, similar to closing a shape in Photoshop or Illustrator. Clicking on
a shape or its the label will select a shape so you can change the label, its
position and size or delete it. See here
for more details about the interface and its configuration options.
Try it live and draw more bounding boxes!
Bounding box data format New: 1.10
As of v1.10, Prodigy exposes more detailed information for rectangular bounding boxes, giving you all the measurements you need for training your model. All coordinates and measurements are provided in pixels, relative to the original image.

Bounding box
Image collections and multi-page documents New: 1.17
If you organize your images in subdirectories, you can set --loader pages to group them together in a single interface using the pages UI. This can be especially useful for multi-page documents or collections of images that should be viewed together. If you’re working with PDFs, the Prodigy-PDF plugin also supports loading paginated documents.
Loading images from URLs instead of a directory
If you don’t want to store the image data with the tasks, the easiest way to
load images is by providing URLs. Modern browsers typically
block images from local paths
for security reasons. So you can either host the images with a local web
server (e.g. Prodigy’s
image-server loader) or in an S3 bucket
(or similar). You can then load in a JSONL file formatted like this:
images.jsonl
It’s recommended to include additional meta like an "id" or a "text"
describing the image so you don’t lose the reference to the image if the links
stop working. Additional custom keys you add to the task data will be passed
through and stored in the dataset with the annotations. To load the image data
from a file, you can pass your JSONL file to image.manual and set
--loader json. You also want to set --no-fetch to tell Prodigy to not try
and convert all images to base64.
If you load in data from a JSONL file, you can also pre-populate the "spans"
with already annotated bounding boxes. For example, you can export Prodigy
annotations with db-out and re-annotate them, or convert older existing
annotations to Prodigy’s format.
Image classification
Many computer vision tasks only require assigning labels to whole images.
Framing your annotation problem this way lets you collect data much faster. It
also makes it easier to compare answers or use a workflow like review to
resolve conflicts (which would be more difficult for bounding boxes, since their
pixels are never going to be identical, so you need additional logic to
determine whether two people annotated the same box).
Assigning a binary label to images
If you only have one category and you want to annotate whether a label applies
to an image or not, the easiest way to get started is to use the mark. It
will stream in whatever is in your data using a loader of your choice, assign an
optional "label" and render the annotation task with a given
interface. In this example, we’re annotating whether a
finger is covering the lens:
Try it live and accept or reject!
If the label applies, you can hit accept, otherwise you can hit
reject. The interface used to render this task is the
classification interface, which shows any content (text, images or HTML) with a label on
top. Setting --loader images tells Prodigy to use the image
loader.
Assigning multiple labels to images
If your label set consists of multiple labels, you can use the choice
interface to render them as multiple choice options. Let’s say you work in the
fashion retail industry and you have a bunch of images of people wearing
products by a specific brand. You already know the brand, but you want to match
up the exact models to items in your catalogue.
Try it live and select an option!
If you recognize the model, you can select one of the options. If the question itself is wrong – for instance, if the sunglasses pictured are a different brand – you can hit reject. And if you’re not sure, you can hit
ignore. When you export the annotations later, you can filter by "answer" to filter out
problematic images or use the rejected examples to fix mistakes in your upstream pipeline.
The custom recipe for this workflow is pretty straightforward: using the
get_stream util, Prodigy will
automically resolve a directory of images to use the Image loader. You can then
add a list of "options" to each incoming example. The "text" value is
displayed to the user and the "id" is used under the hood. IDs can be integers
or strings, so you can also use your internal catalogue identifiers. When you
select options, their "id" values will be added to the task as "accept",
e.g. "accept": [2].
recipe.py
Selecting images for a given label
This example shows a classic “CAPTCHA”-style task. The annotator is asked to select all images that a label applies to – in this case, whether the low-resolution image shows a car.
Under the hood, this workflow uses the choice interface with a
top-level "label" and three "options" that all define an "image". For
multiple image options, Prodigy will try to align them as nicely as possible in
columns. When you select options, their "id" values will be added to the task,
as "accept", e.g. "accept": [1, 3].
Example JSON task
All the stream in your custom recipe needs to do is select the image options and
create a task dict consisting of the "label" and the "options". In this
example, we’re using a random sample from a list – but depending on your use
case, you probably want to use a different selection strategy. If you already
have a selection of images that you know should never be selected, you could
also randomly mix them in with the options and assign them a special ID. When
you export the data later on, this lets you assess the annotation quality.
recipe.py
Using a custom model
If you can load your custom model in Python, you can integrate it with Prodigy
using a custom recipe. To view your model’s predictions
in the annotation UI, your recipe needs to create a stream that processes each
incoming image and adds the data in Prodigy’s JSON format. For
example, you could add a classification "label" predicted by your model, or
add "spans" containing one or more bounding boxes or polygon shapes.
If your model needs to consume the image data as bytes, you can use the
b64_uri_to_bytes helper function that
takes a base64-encoded data URI (created by Prodigy’s image loader) and returns
a byte string.
import prodigyfrom prodigy.components.stream import get_streamfrom prodigy.util import b64_uri_to_bytes
@prodigy.recipe("classify-images")def classify_images(dataset, source):
    def predict(stream, model):        for eg in stream:            image_bytes = b64_uri_to_bytes(eg["image"])            # Pass the image (bytes) to your model and get its predictions            predictions = model(image_bytes)            # 🚨 Add the predictions to the task, e.g. as "label" or "spans"            # ...            yield eg
    stream = get_stream(source)
    custom_model = load_your_custom_model()    stream.apply(predict, model=custom_model)
    return {        "dataset": dataset,        "stream": stream,        "view_id": "choice",        "config": {            "choice_style": "single",  # or "multiple"            "choice_auto_accept": True,        }    }
What you add to the task depends on your model:
-
Image classification: In this case, the model’s predictions could be a list of labels and their scores. You could then pick the label with the highest score, add it as
eg["label"]and annotate whether it’s correct. You could also use the labels with the highest scores to pre-select answers in achoiceinterface, or use a sorter likeprefer_uncertainorprefer_high_scoresto decide which examples to send out for annotation. -
Object detection: In this case, the model would predict bounding boxes and their labels. For each bounding box, you could add an entry to
eg["spans"]with a"label"and"points"describing the coordinates. If you use theimage_manualinterface, you’ll be able to remove incorrect boxes and add new ones. If you use theimageinterface and yield out one task for each bounding box, you’ll be able to accept or reject the individual predictions separately.
Tip: Converting bounding box measurements to pixel coordinates
Depending on the implementation you use, your model might represent bounding
boxes using the x and y coordinates of the center and the width and
height of the box. To convert this format to the [x, y] pixel coordinates of
the bounding box corners used by Prodigy, you can run this handy helper
function:
def convert_points(x, y, width, height): return [[x - width / 2, y - height / 2], [x - width / 2, y + height / 2], [x + width / 2, y + height / 2], [x + width / 2, y - height / 2]]For example, a bounding box with a center at 500px/300px that’s 100px wide and
150px high has the corner coordinates
[[450, 225], [450, 375], [550, 375], [550, 225]].
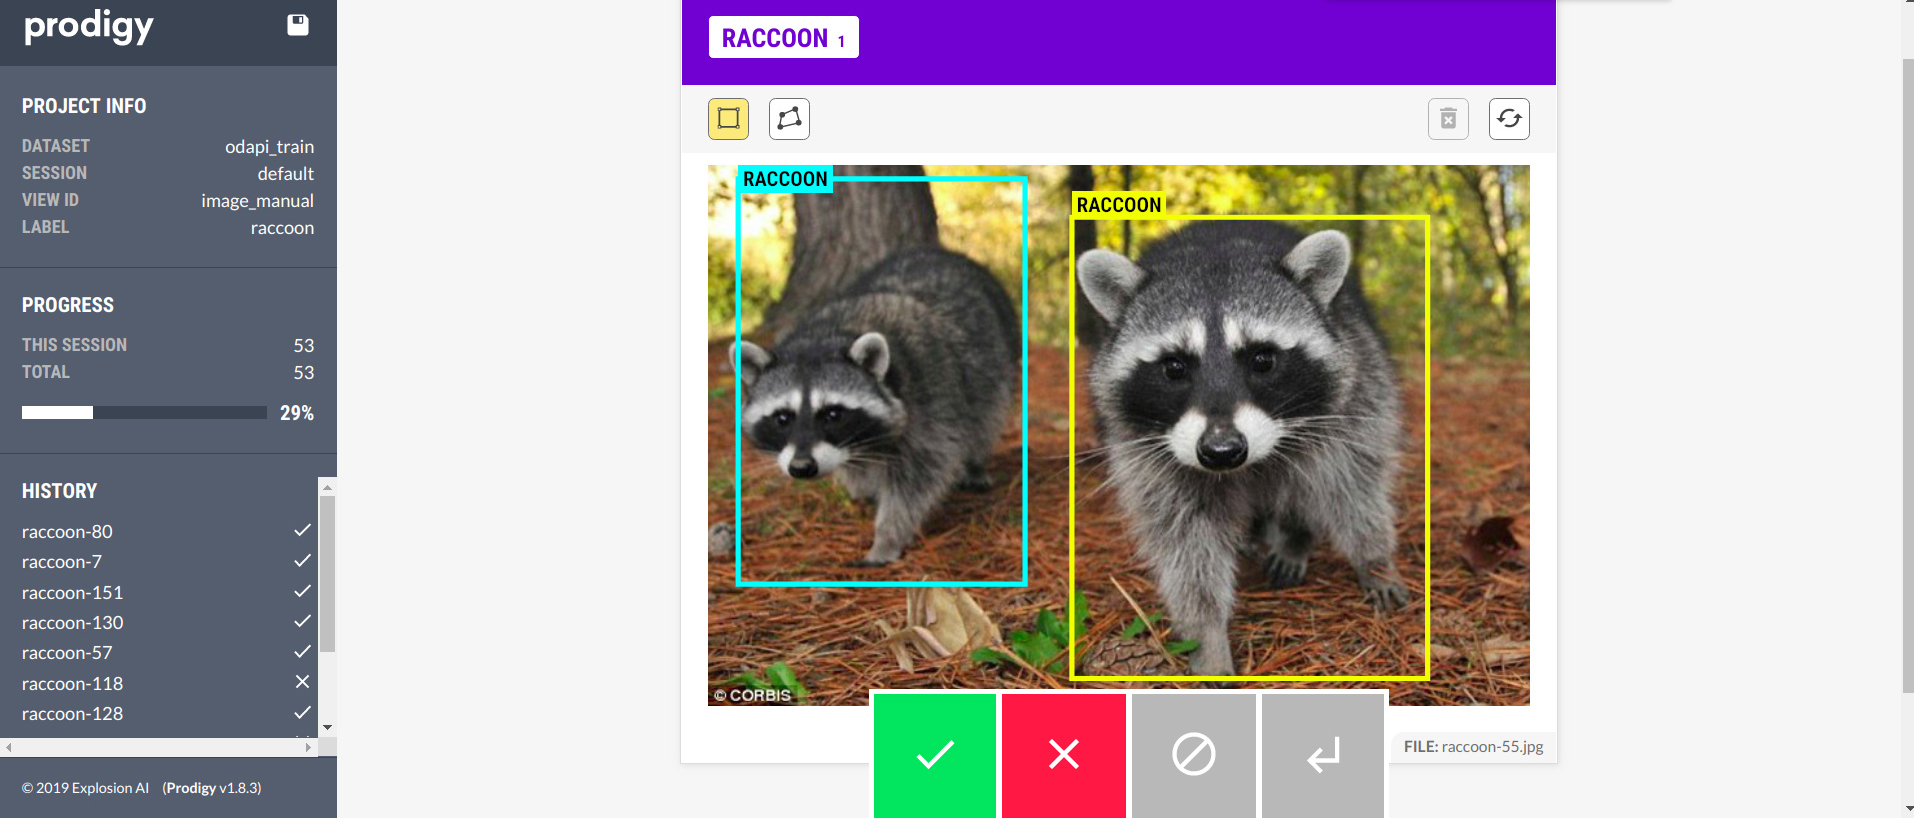
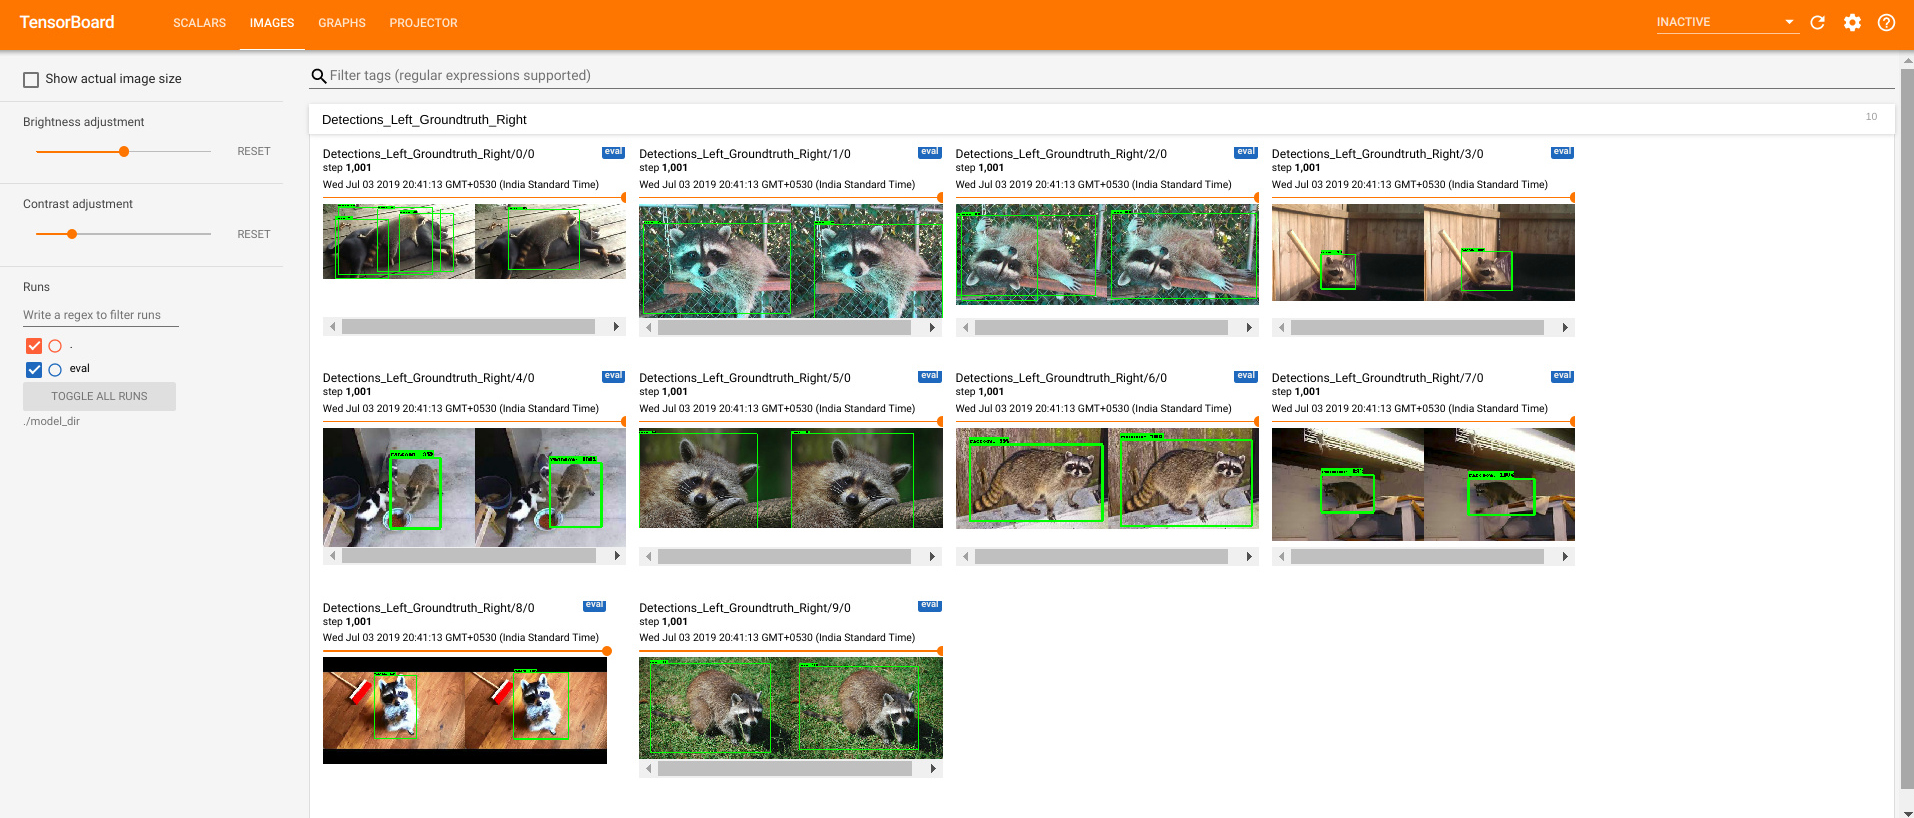
Example: Using Prodigy with TensorFlow’s object detection API
This great tutorial by Abhijit Balaji
explains the process of creating a custom recipe to integrate Prodigy with
TensorFlow’s object detection API
and use a TensorFlow model in the loop for semi-automatic annotation of
cute raccoons. The custom recipe
uses TensorFlow Serving to make
predictions and sends annotations created in Prodigy back to the model. As you
annotate, the model in the loop is updated and saved as a model.ckpt.